> ## Documentation Index
> Fetch the complete documentation index at: https://docs.oculusproxies.com/llms.txt
> Use this file to discover all available pages before exploring further.
# How to Set Up Oculus Proxies With Accovod
> Boost your efficiency and simplify multi-account management with Oculus Proxies in Accovod Browser. This guide will help you configure secure and reliable proxy connections for seamless browsing and enhanced privacy.
 ## What is Accovod?
**Accovod** is a powerful tool designed to simplify multi-account management and maximize workflow efficiency. It eliminates the hassle of handling multiple browser windows by keeping all profiles in one place, allowing seamless switching with a single click. Whether you're managing ad accounts, running marketing campaigns, or handling multiple online identities, Accovod ensures a smooth and secure browsing experience. With **Oculus Proxies**, you can further enhance privacy, utilize secure proxy connections, and optimize your online operations.
If you’re using **Oculus** to access search engines like **Google, Bing, or Yandex** and facing connection issues, the proxy type could be the reason. **ISP Premium Proxies** ensure stable and unrestricted access, preventing blocks that standard proxies might encounter. Switching to **ISP Premium Proxies** can help maintain smooth and reliable performance.
## How to Set Up Oculus Proxies With Accovod Browser
1\. Download **Accovod** from the official [Accovod website](https://accovod.com/).
2\. Follow the installation instructions and launch the application.
1\. Open **Accovod Browser**.
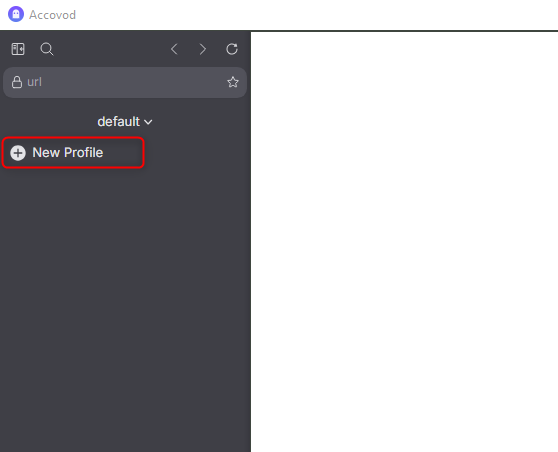
2\. Click **New Profile** to set up a browsing session.
## What is Accovod?
**Accovod** is a powerful tool designed to simplify multi-account management and maximize workflow efficiency. It eliminates the hassle of handling multiple browser windows by keeping all profiles in one place, allowing seamless switching with a single click. Whether you're managing ad accounts, running marketing campaigns, or handling multiple online identities, Accovod ensures a smooth and secure browsing experience. With **Oculus Proxies**, you can further enhance privacy, utilize secure proxy connections, and optimize your online operations.
If you’re using **Oculus** to access search engines like **Google, Bing, or Yandex** and facing connection issues, the proxy type could be the reason. **ISP Premium Proxies** ensure stable and unrestricted access, preventing blocks that standard proxies might encounter. Switching to **ISP Premium Proxies** can help maintain smooth and reliable performance.
## How to Set Up Oculus Proxies With Accovod Browser
1\. Download **Accovod** from the official [Accovod website](https://accovod.com/).
2\. Follow the installation instructions and launch the application.
1\. Open **Accovod Browser**.
2\. Click **New Profile** to set up a browsing session.
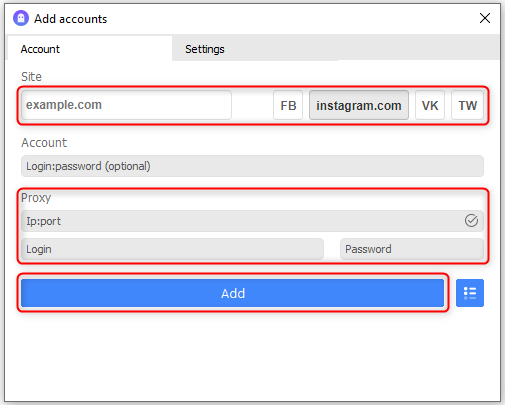
 1\. Select the **website you want to browse**.
2\. Enter the **Proxy details** in the required fields:
* **Host**: `proxy.oculus-proxy.com`
* **Port**: Use the port from your [Oculus Dashboard](https://oculusproxies.com/dashboard/page/plans).
* **Login & Password**: Enter your Oculus Proxy credentials.
3\. Click **Add** to save the settings.
1\. Select the **website you want to browse**.
2\. Enter the **Proxy details** in the required fields:
* **Host**: `proxy.oculus-proxy.com`
* **Port**: Use the port from your [Oculus Dashboard](https://oculusproxies.com/dashboard/page/plans).
* **Login & Password**: Enter your Oculus Proxy credentials.
3\. Click **Add** to save the settings.
 1\. Your newly created profile will appear on the left.
2\. The website will load on the right—confirm that your proxy is working.
1\. Your newly created profile will appear on the left.
2\. The website will load on the right—confirm that your proxy is working.
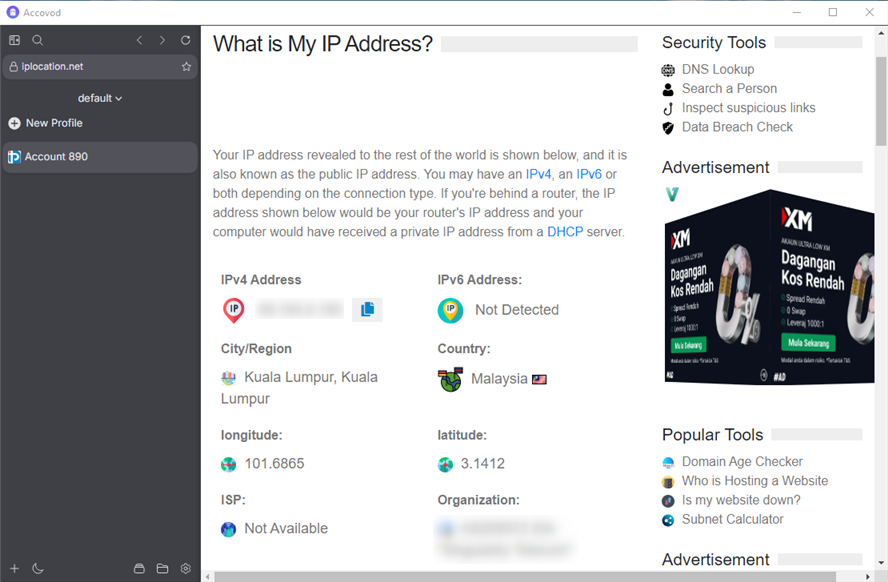 **Success!** You’ve now configured **Oculus Proxies** in **Accovod Browser**. Enjoy secure, efficient, and anonymous browsing across all your online activities.