> ## Documentation Index
> Fetch the complete documentation index at: https://docs.oculusproxies.com/llms.txt
> Use this file to discover all available pages before exploring further.
# How to Set Up Oculus Proxies with AEZAKMI
> Streamline your online operations! Integrating Oculus Proxies with AEZAKMI helps you manage multiple accounts, bypass blocks, and stay anonymous. Follow this step-by-step guide to configure Oculus Proxies in AEZAKMI.
 ## What is AEZAKMI?
**AEZAKMI** is a powerful browser fingerprint management tool that enables users to create unique, undetectable browser profiles. It’s widely used in **social media marketing, e-commerce, and traffic arbitrage** to operate multiple accounts securely.
By integrating **Oculus Proxies** with AEZAKMI, you enhance anonymity, prevent IP bans, and avoid CAPTCHAs—ensuring a seamless workflow across different platforms.
If you're using **Oculus** to access search engines like **Google, Bing, or Yandex** and experiencing connection issues, the proxy type might be the cause. **ISP Premium Proxies** ensure stable and unrestricted access, preventing blocks that standard proxies might encounter. Switching to **ISP Premium Proxies** can help maintain smooth and reliable performance.
## How to Integrate Oculus Proxies With AEZAKMI
1\. Visit the official [AEZAKMI website](https://aezakmi.run/).
2\. Download and install the AEZAKMI application.
3\. Launch AEZAKMI and log in to your account.
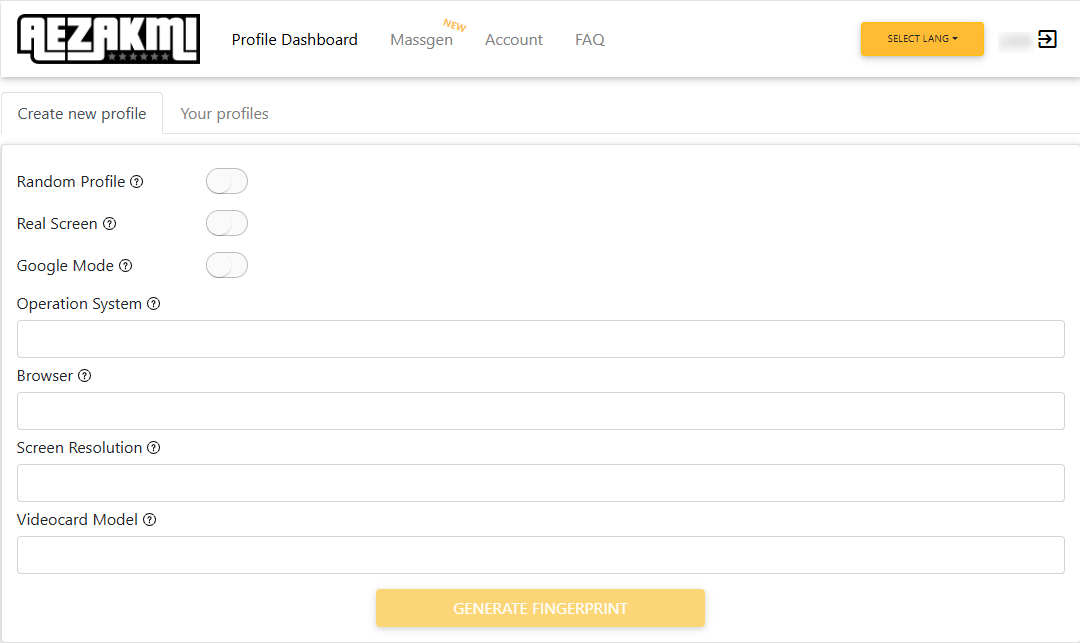
1\. Open your [AEZAKMI dashboard](https://account.aezakmi.run/#/dashboard).
2\. Click **Create New Profile**.
3\. Configure your profile by selecting: Operating System, Browser, Screen Resolution, VideoCard Model.
4\. Click **Generate Fingerprint** to create a unique browser profile.
## What is AEZAKMI?
**AEZAKMI** is a powerful browser fingerprint management tool that enables users to create unique, undetectable browser profiles. It’s widely used in **social media marketing, e-commerce, and traffic arbitrage** to operate multiple accounts securely.
By integrating **Oculus Proxies** with AEZAKMI, you enhance anonymity, prevent IP bans, and avoid CAPTCHAs—ensuring a seamless workflow across different platforms.
If you're using **Oculus** to access search engines like **Google, Bing, or Yandex** and experiencing connection issues, the proxy type might be the cause. **ISP Premium Proxies** ensure stable and unrestricted access, preventing blocks that standard proxies might encounter. Switching to **ISP Premium Proxies** can help maintain smooth and reliable performance.
## How to Integrate Oculus Proxies With AEZAKMI
1\. Visit the official [AEZAKMI website](https://aezakmi.run/).
2\. Download and install the AEZAKMI application.
3\. Launch AEZAKMI and log in to your account.
1\. Open your [AEZAKMI dashboard](https://account.aezakmi.run/#/dashboard).
2\. Click **Create New Profile**.
3\. Configure your profile by selecting: Operating System, Browser, Screen Resolution, VideoCard Model.
4\. Click **Generate Fingerprint** to create a unique browser profile.
 1\. Enter a recognizable name in the **Profile Name** field for easy identification.
2\. Toggle the **Enable Proxy** option to activate proxy settings for this profile.
1\. Enter a recognizable name in the **Profile Name** field for easy identification.
2\. Toggle the **Enable Proxy** option to activate proxy settings for this profile.
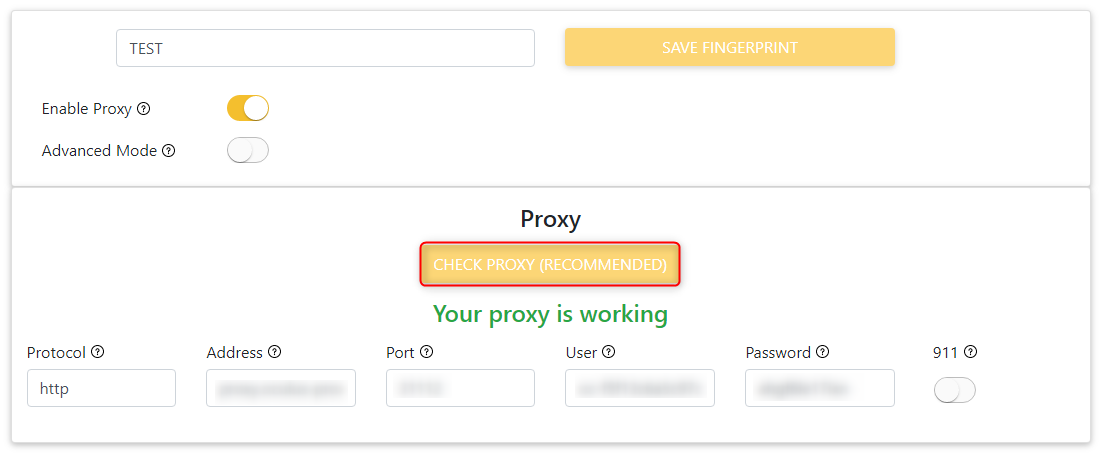
 1\. In the proxy settings section, enter your **Oculus Proxy** details:
* **Protocol:** Select `HTTP`, `HTTPS`, or `SOCKS5` based on your proxy type.
* **Address:** Enter `proxy.oculus-proxy.com`.
* **Port:** Use the port number from your [Oculus dashboard](https://oculusproxies.com/dashboard/page/plans).
* **User:** Enter your Oculus proxy **username**.
* **Password:** Enter your Oculus proxy **password**.
2\. Click **Check Proxy** to verify the connection.
3\. Once successfully verified, click **Save Fingerprint** to save your profile settings.
1\. In the proxy settings section, enter your **Oculus Proxy** details:
* **Protocol:** Select `HTTP`, `HTTPS`, or `SOCKS5` based on your proxy type.
* **Address:** Enter `proxy.oculus-proxy.com`.
* **Port:** Use the port number from your [Oculus dashboard](https://oculusproxies.com/dashboard/page/plans).
* **User:** Enter your Oculus proxy **username**.
* **Password:** Enter your Oculus proxy **password**.
2\. Click **Check Proxy** to verify the connection.
3\. Once successfully verified, click **Save Fingerprint** to save your profile settings.
 **Need a location-specific proxy?** Add a country code to your username. Example: `your-username-country-US` for a U.S. server.
**Congratulations!** You’ve successfully integrated **Oculus Proxies** with **AEZAKMI**. You can now manage multiple accounts securely, bypass geo-restrictions, and automate workflows without the risk of detection or bans. 🚀
**Need a location-specific proxy?** Add a country code to your username. Example: `your-username-country-US` for a U.S. server.
**Congratulations!** You’ve successfully integrated **Oculus Proxies** with **AEZAKMI**. You can now manage multiple accounts securely, bypass geo-restrictions, and automate workflows without the risk of detection or bans. 🚀