> ## Documentation Index
> Fetch the complete documentation index at: https://docs.oculusproxies.com/llms.txt
> Use this file to discover all available pages before exploring further.
# How to Set Up Oculus Proxies on Android
> Follow this step-by-step guide to configure Oculus Proxies on your Android device. While settings may vary by manufacturer, the core setup process remains the same.
 You can set up a proxy on your Android device based on your network type: **Mobile Network** or **Wi-Fi Network**. Follow the instructions below depending on how you connect to the internet.
If you're using **Oculus** to access search engines like **Google, Bing, or Yandex** and experiencing connection issues, your proxy type may need adjustment. **ISP Premium Proxies** provide stable, unrestricted access and help prevent blocks that standard proxies may encounter. Switching to **ISP Premium Proxies** can improve your experience.
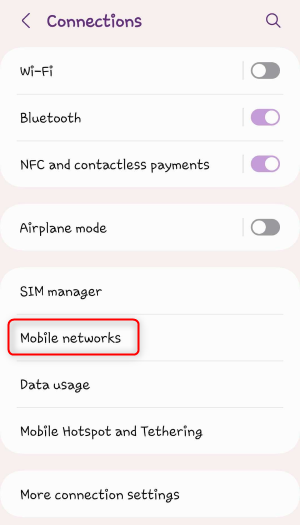
1\. Go to **Settings** on your Android device.
2\. Navigate to **Network & Internet** or **Connections** (depending on your device model).
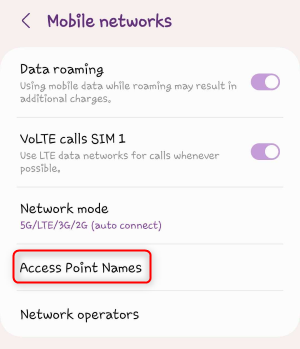
1\. Tap **Mobile Networks**.
2\. Select **Access Point Names (APNs)**.
You can set up a proxy on your Android device based on your network type: **Mobile Network** or **Wi-Fi Network**. Follow the instructions below depending on how you connect to the internet.
If you're using **Oculus** to access search engines like **Google, Bing, or Yandex** and experiencing connection issues, your proxy type may need adjustment. **ISP Premium Proxies** provide stable, unrestricted access and help prevent blocks that standard proxies may encounter. Switching to **ISP Premium Proxies** can improve your experience.
1\. Go to **Settings** on your Android device.
2\. Navigate to **Network & Internet** or **Connections** (depending on your device model).
1\. Tap **Mobile Networks**.
2\. Select **Access Point Names (APNs)**.
 \\
\\
 1\. Select your active **APN**.
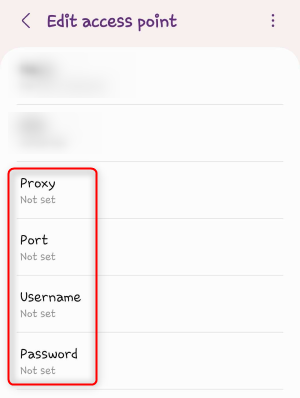
2\. Enter the following details:
* **Proxy:** `proxy.oculus-proxy.com`
* **Port:** Use the port number from your [Oculus dashboard](https://oculusproxies.com/dashboard/page/plans).
* **Username:** Your **Oculus proxy username**.
* **Password:** Your **Oculus proxy password**.
1\. Select your active **APN**.
2\. Enter the following details:
* **Proxy:** `proxy.oculus-proxy.com`
* **Port:** Use the port number from your [Oculus dashboard](https://oculusproxies.com/dashboard/page/plans).
* **Username:** Your **Oculus proxy username**.
* **Password:** Your **Oculus proxy password**.
 1\. Tap **Save** to apply changes.
2\. Turn **Mobile Data** off and back on to refresh the connection.
1\. Open **Settings** on your device.
2\. Navigate to **Network & Internet > Wi-Fi** or **Connections**.
1\. Tap **Save** to apply changes.
2\. Turn **Mobile Data** off and back on to refresh the connection.
1\. Open **Settings** on your device.
2\. Navigate to **Network & Internet > Wi-Fi** or **Connections**.
 1\. Tap on your connected Wi-Fi network.
2\. Click the **Edit** icon (or **Modify Network** on some devices).
1\. Tap on your connected Wi-Fi network.
2\. Click the **Edit** icon (or **Modify Network** on some devices).
 1\. Scroll down and tap **Advanced options**.
2\. Under **Proxy**, select **Manual**.
1\. Fill in the following fields:
* **Host:** `proxy.oculus-proxy.com`
* **Port:** Use the port number from your [Oculus dashboard](https://oculusproxies.com/dashboard/page/plans).
2\. Tap **Save** to apply the proxy settings.
1\. Scroll down and tap **Advanced options**.
2\. Under **Proxy**, select **Manual**.
1\. Fill in the following fields:
* **Host:** `proxy.oculus-proxy.com`
* **Port:** Use the port number from your [Oculus dashboard](https://oculusproxies.com/dashboard/page/plans).
2\. Tap **Save** to apply the proxy settings.
 **Congratulations!** You’ve successfully configured **Oculus Proxies** on your Android device. You can now enjoy secure browsing, bypass geo-restrictions, and protect your online activity with ease. 🚀