> ## Documentation Index
> Fetch the complete documentation index at: https://docs.oculusproxies.com/llms.txt
> Use this file to discover all available pages before exploring further.
# How to Set Up Oculus Proxies With Ghost Browser
> Enhance your productivity and security by integrating Oculus Proxies with Ghost Browser. Follow this guide to configure a proxy for multi-session browsing while maintaining complete anonymity.
 ## What is Ghost Browser?
**Ghost Browser** is a productivity-focused web browser designed to help users manage multiple online accounts simultaneously. Its unique multi-session tabs allow you to log into multiple accounts on the same platform without session conflicts.
By integrating **Oculus Proxies**, you can enhance privacy and security while efficiently managing workflows.
If you're using **Oculus** to access search engines like **Google, Bing, or Yandex** and experiencing connection issues, your proxy type may need adjustment. **ISP Premium Proxies** provide stable and unrestricted access, preventing blocks that standard proxies might encounter. Switching to **ISP Premium Proxies** can improve performance.
## How to Integrate Oculus Proxies With Ghost Browser
1\. Download **Ghost Browser** from the [official website](https://ghostbrowser.com/download/).
2\. Follow the installation steps and open the browser.
3\. Log in to your **Ghost Browser** account. If you don’t have one, create a new account.
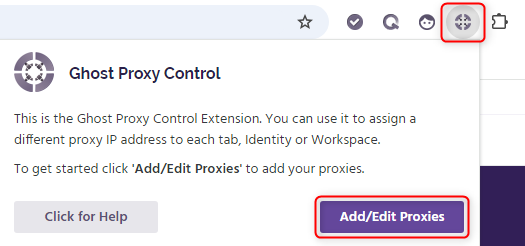
1\. Click the **Ghost Proxy Control** icon in the top-right corner of the browser.
2\. Select **Add/Edit Proxies** from the dropdown menu.
## What is Ghost Browser?
**Ghost Browser** is a productivity-focused web browser designed to help users manage multiple online accounts simultaneously. Its unique multi-session tabs allow you to log into multiple accounts on the same platform without session conflicts.
By integrating **Oculus Proxies**, you can enhance privacy and security while efficiently managing workflows.
If you're using **Oculus** to access search engines like **Google, Bing, or Yandex** and experiencing connection issues, your proxy type may need adjustment. **ISP Premium Proxies** provide stable and unrestricted access, preventing blocks that standard proxies might encounter. Switching to **ISP Premium Proxies** can improve performance.
## How to Integrate Oculus Proxies With Ghost Browser
1\. Download **Ghost Browser** from the [official website](https://ghostbrowser.com/download/).
2\. Follow the installation steps and open the browser.
3\. Log in to your **Ghost Browser** account. If you don’t have one, create a new account.
1\. Click the **Ghost Proxy Control** icon in the top-right corner of the browser.
2\. Select **Add/Edit Proxies** from the dropdown menu.
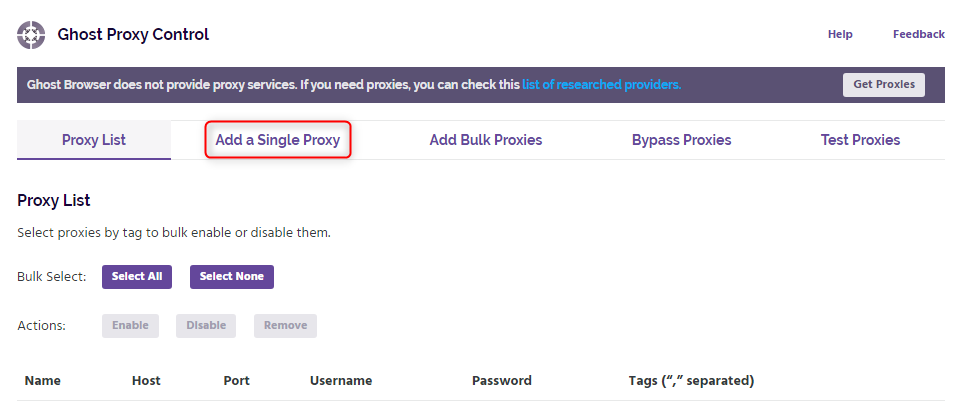
 In the **Proxy Manager**, click **Add a Single Proxy**.
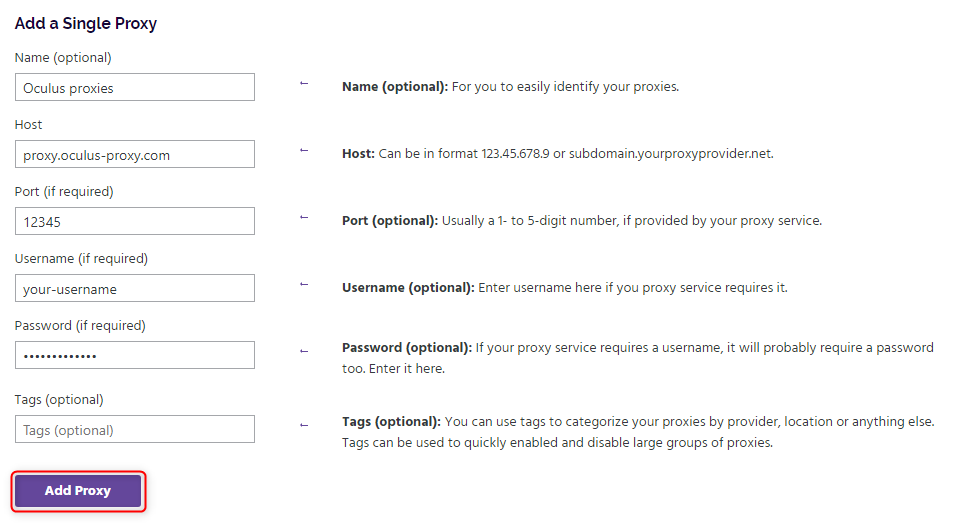
 1\. Fill in the **proxy details**:
* **Name (Optional):** Add a custom name (e.g., "Oculus Proxy").
* **Host:** `proxy.oculus-proxy.com`
* **Port:** Use the port number from your [Oculus Dashboard](https://oculusproxies.com/dashboard/page/plans).
* **Username:** Your **Oculus Proxy username**.
* **Password:** Your **Oculus Proxy password**.
2\. Click **Add Proxy** to save the configuration.
1\. Fill in the **proxy details**:
* **Name (Optional):** Add a custom name (e.g., "Oculus Proxy").
* **Host:** `proxy.oculus-proxy.com`
* **Port:** Use the port number from your [Oculus Dashboard](https://oculusproxies.com/dashboard/page/plans).
* **Username:** Your **Oculus Proxy username**.
* **Password:** Your **Oculus Proxy password**.
2\. Click **Add Proxy** to save the configuration.
 **Need a country-specific proxy?** Modify your username to include a country code (e.g., `your-username-country-US` for a U.S.-based proxy).
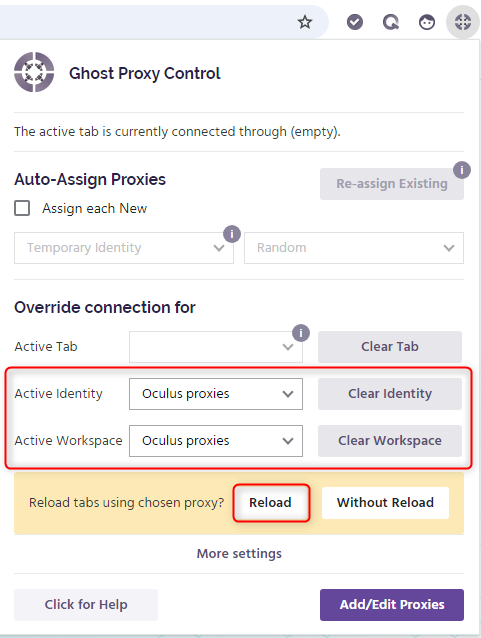
1\. Go back to the **Ghost Proxy Control** menu.
2\. Under **Active Identity** or **Active Workspace**, select the Oculus proxy you just added.
3\. Reload your browser tabs to apply the proxy settings.
**Need a country-specific proxy?** Modify your username to include a country code (e.g., `your-username-country-US` for a U.S.-based proxy).
1\. Go back to the **Ghost Proxy Control** menu.
2\. Under **Active Identity** or **Active Workspace**, select the Oculus proxy you just added.
3\. Reload your browser tabs to apply the proxy settings.
 1\. Open a new tab in **Ghost Browser**.
2\. Visit [httpbin.org/ip](http://httpbin.org/ip) to check your current IP address.
3\. Ensure that the displayed IP matches your **Oculus Proxy** settings.
**Success!** You’ve successfully integrated **Oculus Proxies** with **Ghost Browser**. Now you can securely **manage multiple accounts, automate tasks, and browse the web without detection**. 🚀
1\. Open a new tab in **Ghost Browser**.
2\. Visit [httpbin.org/ip](http://httpbin.org/ip) to check your current IP address.
3\. Ensure that the displayed IP matches your **Oculus Proxy** settings.
**Success!** You’ve successfully integrated **Oculus Proxies** with **Ghost Browser**. Now you can securely **manage multiple accounts, automate tasks, and browse the web without detection**. 🚀