> ## Documentation Index
> Fetch the complete documentation index at: https://docs.oculusproxies.com/llms.txt
> Use this file to discover all available pages before exploring further.
# How to Integrate Oculus Proxies with Kameleo
> Take your multi-account management to the next level! By integrating Oculus Proxies with Kameleo, you can enhance privacy, ensure security, and stay undetectable. This guide will walk you through the process step-by-step, helping you set up a reliable browsing environment for all your profiles.
 ## What is Kameleo?
**Kameleo** is an anti-detect browser that helps you manage multiple online accounts securely and anonymously. It creates unique browser profiles with customizable fingerprints—like user agents and screen resolutions—making every profile look distinct.
Paired with **Oculus Proxies**, Kameleo lets you bypass IP bans, avoid detection, and handle multiple tasks like social media management, e-commerce operations, or web scraping efficiently.
If you're using **Oculus** to access search engines like **Google, Bing, or Yandex** and facing connection issues, the proxy type could be the reason. **ISP Premium Proxies** ensure stable and unrestricted access, preventing blocks that standard proxies might encounter. Switching to **ISP Premium Proxies** can help maintain smooth and reliable performance.
## How to Integrate Oculus Proxies with Kameleo
1\. Visit the [Kameleo website](https://kameleo.io/downloads) and download the application.
2\. Select the correct version for your operating system.
3\. Follow the on-screen instructions to complete the installation.
1\. Click **New Profile** on the left navigation panel to create a new browser profile.
2\. Configure basic settings, such as the device type, operating system, browser, and language preferences.
1\. Navigate to the **Connection** section of the profile setup menu.
2\. Enter the following proxy details:
* **Proxy Type**: Select `HTTP`, `HTTPS`, or `SOCKS5` based on your proxy type.
* **Host**: `proxy.oculus-proxy.com`.
* **Port**: Use the port number provided in your [Oculus Dashboard](https://oculusproxies.com/dashboard/page/plans).
3\. Toggle **Authentication** to *On* to reveal the username and password fields.
4\. Enter your Oculus proxy:
* **Username**: Your Oculus proxy username.
* **Password**: Your Oculus proxy password.
## What is Kameleo?
**Kameleo** is an anti-detect browser that helps you manage multiple online accounts securely and anonymously. It creates unique browser profiles with customizable fingerprints—like user agents and screen resolutions—making every profile look distinct.
Paired with **Oculus Proxies**, Kameleo lets you bypass IP bans, avoid detection, and handle multiple tasks like social media management, e-commerce operations, or web scraping efficiently.
If you're using **Oculus** to access search engines like **Google, Bing, or Yandex** and facing connection issues, the proxy type could be the reason. **ISP Premium Proxies** ensure stable and unrestricted access, preventing blocks that standard proxies might encounter. Switching to **ISP Premium Proxies** can help maintain smooth and reliable performance.
## How to Integrate Oculus Proxies with Kameleo
1\. Visit the [Kameleo website](https://kameleo.io/downloads) and download the application.
2\. Select the correct version for your operating system.
3\. Follow the on-screen instructions to complete the installation.
1\. Click **New Profile** on the left navigation panel to create a new browser profile.
2\. Configure basic settings, such as the device type, operating system, browser, and language preferences.
1\. Navigate to the **Connection** section of the profile setup menu.
2\. Enter the following proxy details:
* **Proxy Type**: Select `HTTP`, `HTTPS`, or `SOCKS5` based on your proxy type.
* **Host**: `proxy.oculus-proxy.com`.
* **Port**: Use the port number provided in your [Oculus Dashboard](https://oculusproxies.com/dashboard/page/plans).
3\. Toggle **Authentication** to *On* to reveal the username and password fields.
4\. Enter your Oculus proxy:
* **Username**: Your Oculus proxy username.
* **Password**: Your Oculus proxy password.
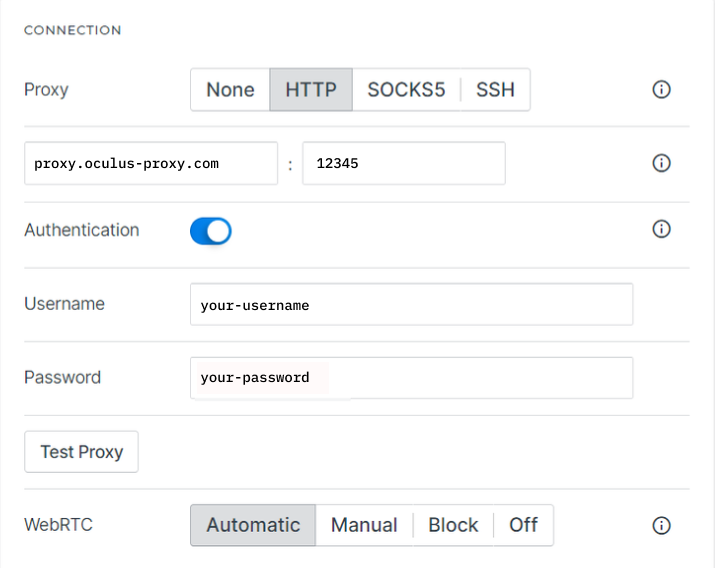 For country-specific proxies, you can enter a format like `your-username-country-US` to receive a US exit node.
1\. Click **Test Proxy** to verify the connection.
2\. If the test is successful, your proxy is configured correctly.
3\. If the test fails:
* Double-check your **username** and **password**.
* Ensure the **proxy type** matches your selected protocol (HTTP, HTTPS, or SOCKS5).
* Try a different port if needed.
1\. Once your proxy settings are confirmed, click **OK** to save the profile.
2\. On the dashboard, locate your newly created profile.
3\. Click **START** to launch the browser with the configured proxy settings.
4\. To verify that the proxy is active:
* Open a browser tab and visit [httpbin.org/ip](http://httpbin.org/ip).
* Ensure that the displayed IP matches the Oculus Proxy.
**Congratulations!** You’ve successfully integrated **Oculus Proxies** with **Kameleo**. Your browsing is now private, secure, and optimized for managing multiple accounts seamlessly.
For country-specific proxies, you can enter a format like `your-username-country-US` to receive a US exit node.
1\. Click **Test Proxy** to verify the connection.
2\. If the test is successful, your proxy is configured correctly.
3\. If the test fails:
* Double-check your **username** and **password**.
* Ensure the **proxy type** matches your selected protocol (HTTP, HTTPS, or SOCKS5).
* Try a different port if needed.
1\. Once your proxy settings are confirmed, click **OK** to save the profile.
2\. On the dashboard, locate your newly created profile.
3\. Click **START** to launch the browser with the configured proxy settings.
4\. To verify that the proxy is active:
* Open a browser tab and visit [httpbin.org/ip](http://httpbin.org/ip).
* Ensure that the displayed IP matches the Oculus Proxy.
**Congratulations!** You’ve successfully integrated **Oculus Proxies** with **Kameleo**. Your browsing is now private, secure, and optimized for managing multiple accounts seamlessly.