> ## Documentation Index
> Fetch the complete documentation index at: https://docs.oculusproxies.com/llms.txt
> Use this file to discover all available pages before exploring further.
# How to Use Oculus Proxies on macOS 🍏
> Set up Oculus Proxies on your macOS device to enjoy private, secure, and region-flexible browsing. This guide will take you through the entire configuration process, ensuring you can browse confidently and efficiently.
 ## Benefits of Using Oculus Proxies on macOS
Integrating **Oculus Proxies** into your macOS network setup allows you to:
* **Safeguard Your Privacy**: Mask your real IP address to keep your activities secure and anonymous.
* **Access Region-Specific Content**: Route your connection through different countries to unlock geo-restricted websites and services.
* **Reliable Connections**: Maintain uninterrupted and anonymous browsing across all macOS applications, not just your web browser.
If you're using **Oculus** to access search engines like **Google, Bing, or Yandex** and facing connection issues, the proxy type could be the reason. **ISP Premium Proxies** ensure stable and unrestricted access, preventing blocks that standard proxies might encounter. Switching to **ISP Premium Proxies** can help maintain smooth and reliable performance.
## Steps to Configure Oculus Proxies on macOS
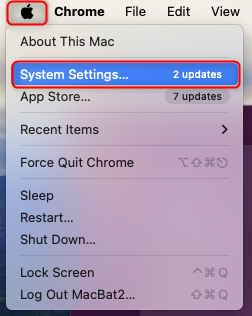
1\. Click the **Apple menu** in the top-left corner of your screen.
2\. Choose **System Settings** (or **System Preferences** if you're using an older macOS version).
## Benefits of Using Oculus Proxies on macOS
Integrating **Oculus Proxies** into your macOS network setup allows you to:
* **Safeguard Your Privacy**: Mask your real IP address to keep your activities secure and anonymous.
* **Access Region-Specific Content**: Route your connection through different countries to unlock geo-restricted websites and services.
* **Reliable Connections**: Maintain uninterrupted and anonymous browsing across all macOS applications, not just your web browser.
If you're using **Oculus** to access search engines like **Google, Bing, or Yandex** and facing connection issues, the proxy type could be the reason. **ISP Premium Proxies** ensure stable and unrestricted access, preventing blocks that standard proxies might encounter. Switching to **ISP Premium Proxies** can help maintain smooth and reliable performance.
## Steps to Configure Oculus Proxies on macOS
1\. Click the **Apple menu** in the top-left corner of your screen.
2\. Choose **System Settings** (or **System Preferences** if you're using an older macOS version).
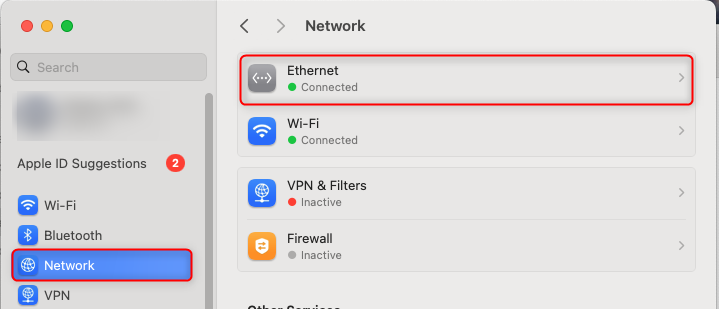
 3\. In the **Network** section, click the connection you want to configure (e.g., **Wi-Fi** or **Ethernet**).
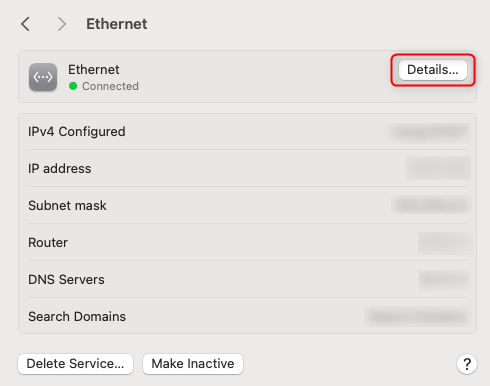
 1\. Click **Details…** (or **Advanced…**) in the bottom-right corner of the **Network** window.
 2\. A new window will appear. Select the **Proxies** tab from the menu on the left.
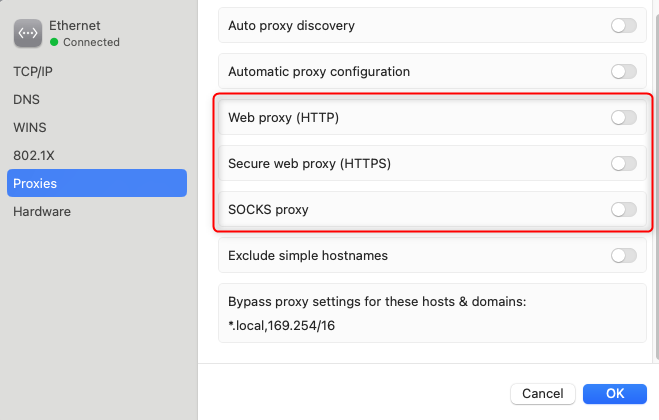
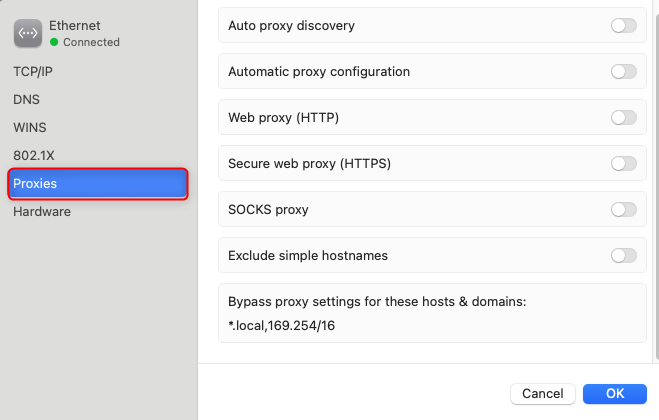 1\. In the **Proxies** tab, check the box next to the type of proxy you want to configure:
* Select **Web Proxy (HTTP)** or **Secure Web Proxy (HTTPS)** for HTTP/HTTPS proxies.
* Select **SOCKS Proxy** for SOCKS5.
1\. In the **Proxies** tab, check the box next to the type of proxy you want to configure:
* Select **Web Proxy (HTTP)** or **Secure Web Proxy (HTTPS)** for HTTP/HTTPS proxies.
* Select **SOCKS Proxy** for SOCKS5.
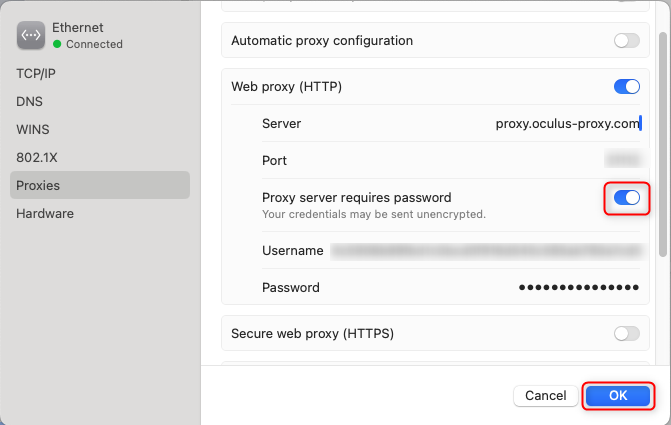
 1\. **Server**: Type the Oculus Proxy Host (e.g., `proxy.oculus-proxy.com`).
2\. **Port**: Input the port number available in your [Oculus Dashboard](https://oculusproxies.com/dashboard/page/plans).
3\. **Enable Authentication**: Check **"Proxy server requires password"** to display the Username and Password fields.
4\. **Username and Password**: Provide your Oculus Proxy login credentials.
For a region-specific proxy, append `-country-XX` to your username (e.g., `your-username-country-US` for a US proxy).
5\. Click **OK** to save the settings.
1\. **Server**: Type the Oculus Proxy Host (e.g., `proxy.oculus-proxy.com`).
2\. **Port**: Input the port number available in your [Oculus Dashboard](https://oculusproxies.com/dashboard/page/plans).
3\. **Enable Authentication**: Check **"Proxy server requires password"** to display the Username and Password fields.
4\. **Username and Password**: Provide your Oculus Proxy login credentials.
For a region-specific proxy, append `-country-XX` to your username (e.g., `your-username-country-US` for a US proxy).
5\. Click **OK** to save the settings.
 1\. Open a browser such as **Safari** or **Chrome** on your macOS device.
2\. Visit [httpbin.org/ip](http://httpbin.org/ip) to confirm your IP address.
3\. If the displayed IP matches the one assigned by your Oculus Proxy, your traffic is now routed securely through the proxy.
**Ready to Browse Safely!** You’ve successfully configured **Oculus Proxies** on your macOS device.
1\. Open a browser such as **Safari** or **Chrome** on your macOS device.
2\. Visit [httpbin.org/ip](http://httpbin.org/ip) to confirm your IP address.
3\. If the displayed IP matches the one assigned by your Oculus Proxy, your traffic is now routed securely through the proxy.
**Ready to Browse Safely!** You’ve successfully configured **Oculus Proxies** on your macOS device.