> ## Documentation Index
> Fetch the complete documentation index at: https://docs.oculusproxies.com/llms.txt
> Use this file to discover all available pages before exploring further.
# How to Use Oculus Proxies With MarketerBrowser
> Enhance your browser profile management with Oculus Proxies. Integrating Oculus with MarketerBrowser allows you to secure your connections, manage multiple accounts, and explore region-specific content with ease. Follow this guide to set up Oculus Proxies with MarketerBrowser today.
 ## What is MarketerBrowser?
**MarketerBrowser** is a specialized browser designed for professionals managing multiple accounts or online campaigns. It allows users to create **isolated browser profiles**, ensuring security and privacy for each session. By integrating **Oculus Proxies**, you can enhance anonymity, bypass geo-restrictions, and minimize detection risks.
If you're using **Oculus** to access search engines like **Google, Bing, or Yandex** and experiencing connection issues, your proxy type may need adjustment. **Search Engine ISP Proxies** provide stable and unrestricted access, preventing blocks that standard proxies might encounter. Switching to **Search Engine ISP Proxies** can help maintain smooth and reliable performance.
## How to Integrate Oculus Proxies With MarketerBrowser
1\. Download MarketerBrowser from the [official website](https://www.marketerbrowser.com/).
2\. Follow the on-screen installation instructions to set up the application on your device.
3\. Open MarketerBrowser and log in using your credentials. If you don’t have an account, register for one.
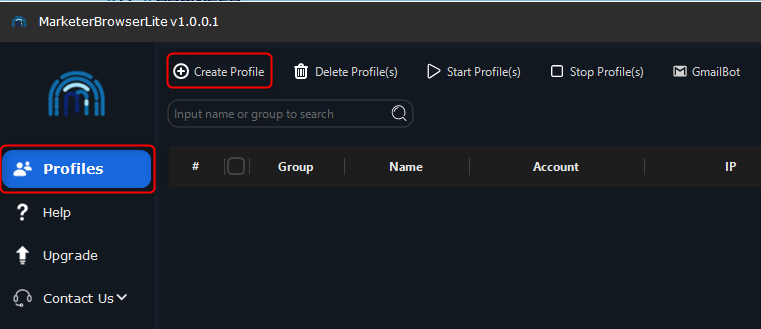
1\. From the **Profiles** tab, click **Create Profile** to set up a new browser instance or select an existing profile to edit.
2\. Provide a descriptive name for the profile in the **Name** field to easily identify it later.
## What is MarketerBrowser?
**MarketerBrowser** is a specialized browser designed for professionals managing multiple accounts or online campaigns. It allows users to create **isolated browser profiles**, ensuring security and privacy for each session. By integrating **Oculus Proxies**, you can enhance anonymity, bypass geo-restrictions, and minimize detection risks.
If you're using **Oculus** to access search engines like **Google, Bing, or Yandex** and experiencing connection issues, your proxy type may need adjustment. **Search Engine ISP Proxies** provide stable and unrestricted access, preventing blocks that standard proxies might encounter. Switching to **Search Engine ISP Proxies** can help maintain smooth and reliable performance.
## How to Integrate Oculus Proxies With MarketerBrowser
1\. Download MarketerBrowser from the [official website](https://www.marketerbrowser.com/).
2\. Follow the on-screen installation instructions to set up the application on your device.
3\. Open MarketerBrowser and log in using your credentials. If you don’t have an account, register for one.
1\. From the **Profiles** tab, click **Create Profile** to set up a new browser instance or select an existing profile to edit.
2\. Provide a descriptive name for the profile in the **Name** field to easily identify it later.
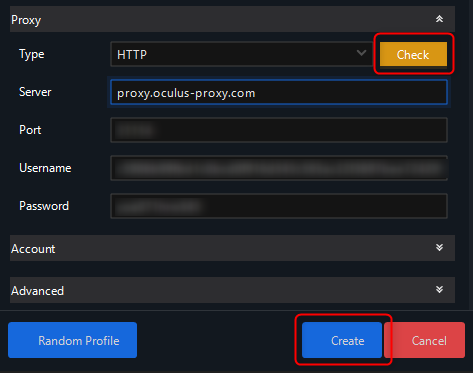
 1\. Locate the **Proxy** section within the profile configuration menu.
2\. Enter your **Oculus Proxy** details:
* **Type:** Select `HTTP`, `HTTPS`, or `SOCKS5`.
* **Server:** Input `proxy.oculus-proxy.com`.
* **Port:** Enter the port number from your [Oculus dashboard](https://oculusproxies.com/dashboard/page/plans).
* **Username:** Use your Oculus proxy **username**.
* **Password:** Enter your Oculus proxy **password**.
3\. Test the proxy connection by clicking **Check** to ensure the setup is working correctly.
4\. Once the proxy details are verified, click **Create** to save the profile configuration.
1\. Locate the **Proxy** section within the profile configuration menu.
2\. Enter your **Oculus Proxy** details:
* **Type:** Select `HTTP`, `HTTPS`, or `SOCKS5`.
* **Server:** Input `proxy.oculus-proxy.com`.
* **Port:** Enter the port number from your [Oculus dashboard](https://oculusproxies.com/dashboard/page/plans).
* **Username:** Use your Oculus proxy **username**.
* **Password:** Enter your Oculus proxy **password**.
3\. Test the proxy connection by clicking **Check** to ensure the setup is working correctly.
4\. Once the proxy details are verified, click **Create** to save the profile configuration.
 1\. Go to the **Profiles** section and select the newly configured profile.
2\. Toggle the **Launch** switch to *On* to activate the profile with your Oculus Proxy settings.
1\. Go to the **Profiles** section and select the newly configured profile.
2\. Toggle the **Launch** switch to *On* to activate the profile with your Oculus Proxy settings.
 1\. Within the launched profile, open the browser and navigate to [httpbin.org/ip](http://httpbin.org/ip).
2\. Confirm that the displayed IP address matches your **Oculus Proxy**, verifying that the setup is working correctly.
**Congratulations!** You’ve successfully integrated **Oculus Proxies** with **MarketerBrowser**. Now you can securely manage multiple accounts, access geo-specific content, and enhance your privacy for seamless browsing and workflow automation. 🚀
1\. Within the launched profile, open the browser and navigate to [httpbin.org/ip](http://httpbin.org/ip).
2\. Confirm that the displayed IP address matches your **Oculus Proxy**, verifying that the setup is working correctly.
**Congratulations!** You’ve successfully integrated **Oculus Proxies** with **MarketerBrowser**. Now you can securely manage multiple accounts, access geo-specific content, and enhance your privacy for seamless browsing and workflow automation. 🚀