> ## Documentation Index
> Fetch the complete documentation index at: https://docs.oculusproxies.com/llms.txt
> Use this file to discover all available pages before exploring further.
# How to Set Up Oculus Proxies With Maskfog
> Simplify and secure your online activities! By integrating Oculus Proxies with Maskfog, you can enhance privacy, manage multiple accounts with ease, and access geo-restricted content securely. This guide will help you set up Oculus Proxies in Maskfog for a smooth and reliable experience.
 ## What is Maskfog?
**Maskfog** is an anti-detect browser designed to create unique browser profiles for secure and anonymous account management. It helps users bypass restrictions, prevent detection, and maintain privacy. When paired with **Oculus Proxies**, Maskfog provides enhanced security, anonymity, and the ability to target specific regions for your tasks.
If you're using **Oculus** to access search engines like **Google, Bing, or Yandex** and facing connection issues, the proxy type could be the reason. **ISP Premium Proxies** ensure stable and unrestricted access, preventing blocks that standard proxies might encounter. Switching to **ISP Premium Proxies** can help maintain smooth and reliable performance.
## How to Integrate Oculus Proxies with Maskfog
1\. Visit the [Maskfog website](https://www.maskfog.com/) to download the application.
2\. Install it on your system.
3\. Log in using your credentials to access the dashboard.
1\. Open **Maskfog** and navigate to the **Proxy Service** section.
2\. Click **Configure Device** to start creating a new proxy configuration.
## What is Maskfog?
**Maskfog** is an anti-detect browser designed to create unique browser profiles for secure and anonymous account management. It helps users bypass restrictions, prevent detection, and maintain privacy. When paired with **Oculus Proxies**, Maskfog provides enhanced security, anonymity, and the ability to target specific regions for your tasks.
If you're using **Oculus** to access search engines like **Google, Bing, or Yandex** and facing connection issues, the proxy type could be the reason. **ISP Premium Proxies** ensure stable and unrestricted access, preventing blocks that standard proxies might encounter. Switching to **ISP Premium Proxies** can help maintain smooth and reliable performance.
## How to Integrate Oculus Proxies with Maskfog
1\. Visit the [Maskfog website](https://www.maskfog.com/) to download the application.
2\. Install it on your system.
3\. Log in using your credentials to access the dashboard.
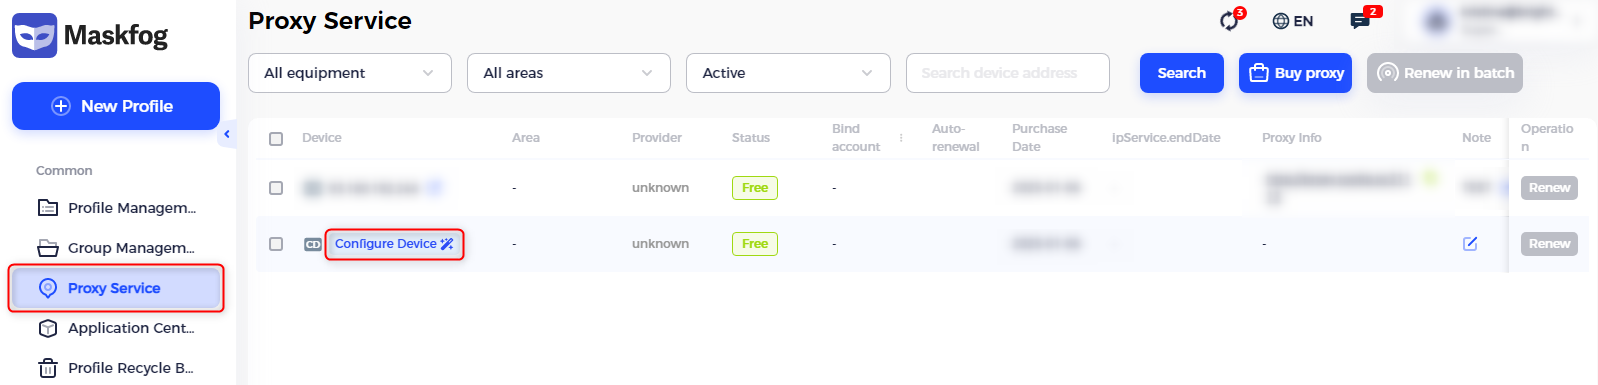
1\. Open **Maskfog** and navigate to the **Proxy Service** section.
2\. Click **Configure Device** to start creating a new proxy configuration.
 1\. Assign a name to your configuration in the **Proxy Name** field to easily recognize it later.
2\. Fill in the proxy credentials retrieved from your [Oculus Dashboard](https://oculusproxies.com/dashboard/page/plans):
* **Proxy Type**: Choose HTTP, HTTPS, or SOCKS5 based on your proxy type.
* **Proxy Host**: Input `proxy.oculus-proxy.com`.
* **Proxy Port**: Enter the port number provided in your dashboard.
* **Username**: Use your Oculus Proxy username.
* **Password**: Enter your Oculus Proxy password.
3\. Test the proxy connection by clicking **Check Proxy**.
4\. If the connection is verified successfully, click **OK** to save the settings.
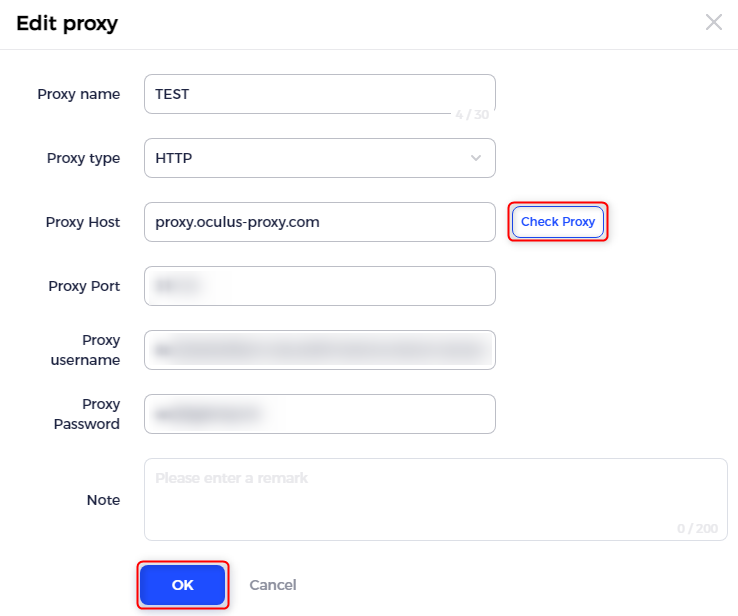
1\. Assign a name to your configuration in the **Proxy Name** field to easily recognize it later.
2\. Fill in the proxy credentials retrieved from your [Oculus Dashboard](https://oculusproxies.com/dashboard/page/plans):
* **Proxy Type**: Choose HTTP, HTTPS, or SOCKS5 based on your proxy type.
* **Proxy Host**: Input `proxy.oculus-proxy.com`.
* **Proxy Port**: Enter the port number provided in your dashboard.
* **Username**: Use your Oculus Proxy username.
* **Password**: Enter your Oculus Proxy password.
3\. Test the proxy connection by clicking **Check Proxy**.
4\. If the connection is verified successfully, click **OK** to save the settings.
 For region-specific proxies, append the desired country code to your username (e.g., `your-username-country-US` for a US-based proxy).
Integrating **Oculus Proxies** with **Maskfog** provides a secure and seamless browsing environment tailored to your needs. Whether you’re managing multiple accounts, accessing region-specific content, or automating workflows, this setup ensures reliability and privacy.
For region-specific proxies, append the desired country code to your username (e.g., `your-username-country-US` for a US-based proxy).
Integrating **Oculus Proxies** with **Maskfog** provides a secure and seamless browsing environment tailored to your needs. Whether you’re managing multiple accounts, accessing region-specific content, or automating workflows, this setup ensures reliability and privacy.