> ## Documentation Index
> Fetch the complete documentation index at: https://docs.oculusproxies.com/llms.txt
> Use this file to discover all available pages before exploring further.
# How to Set Up Oculus Proxies With MuLogin
> Enhance your MuLogin experience by integrating Oculus Proxies. This guide will show you how to configure secure, anonymous proxy connections for better account management, automation, and data gathering across multiple profiles.
 ## What is MuLogin?
MuLogin is a multi-profile browser designed to simplify the management of multiple online accounts. It isolates each browser session into its own environment, preventing cross-account detection and ensuring user privacy. Whether you're managing e-commerce stores, running marketing campaigns, or handling social media accounts, MuLogin offers a seamless way to operate multiple profiles without interference.
If you're using **Oculus** to access search engines like **Google, Bing, or Yandex** and facing connection issues, the proxy type could be the reason. **ISP Premium Proxies** ensure stable and unrestricted access, preventing blocks that standard proxies might encounter. Switching to **ISP Premium Proxies** can help maintain smooth and reliable performance.
## How to Set Up Oculus Proxies in MuLogin
1\. Visit the [MuLogin website](https://www.mulogin.com/) and log in to your account.
2\. After logging in, navigate to your dashboard, which displays your browser profiles (if any are already created).
1\. To create a new profile, click the **Quick create** button on the dashboard.
## What is MuLogin?
MuLogin is a multi-profile browser designed to simplify the management of multiple online accounts. It isolates each browser session into its own environment, preventing cross-account detection and ensuring user privacy. Whether you're managing e-commerce stores, running marketing campaigns, or handling social media accounts, MuLogin offers a seamless way to operate multiple profiles without interference.
If you're using **Oculus** to access search engines like **Google, Bing, or Yandex** and facing connection issues, the proxy type could be the reason. **ISP Premium Proxies** ensure stable and unrestricted access, preventing blocks that standard proxies might encounter. Switching to **ISP Premium Proxies** can help maintain smooth and reliable performance.
## How to Set Up Oculus Proxies in MuLogin
1\. Visit the [MuLogin website](https://www.mulogin.com/) and log in to your account.
2\. After logging in, navigate to your dashboard, which displays your browser profiles (if any are already created).
1\. To create a new profile, click the **Quick create** button on the dashboard.
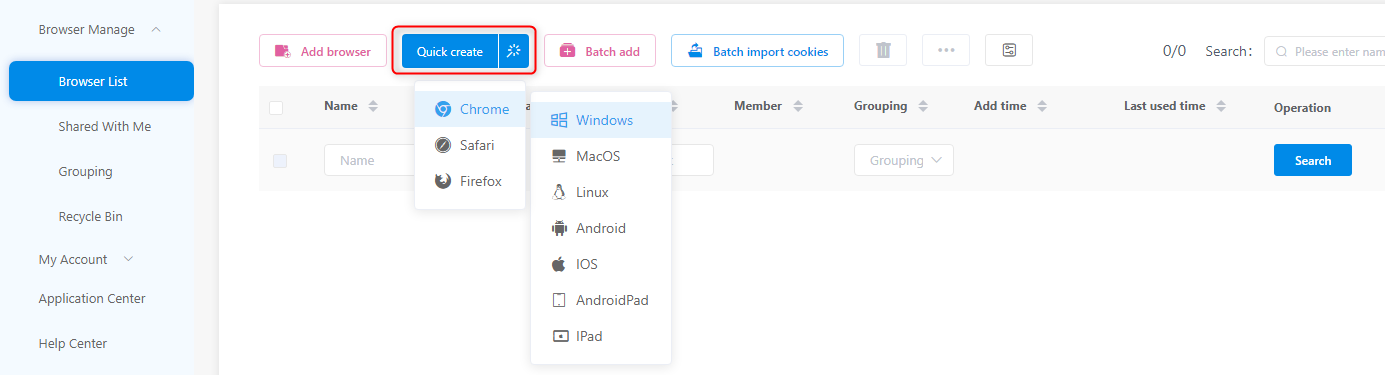 2\. To modify an existing profile, select it from the list and click **Edit**, **Settings**, or the **gear icon**, depending on your MuLogin version.
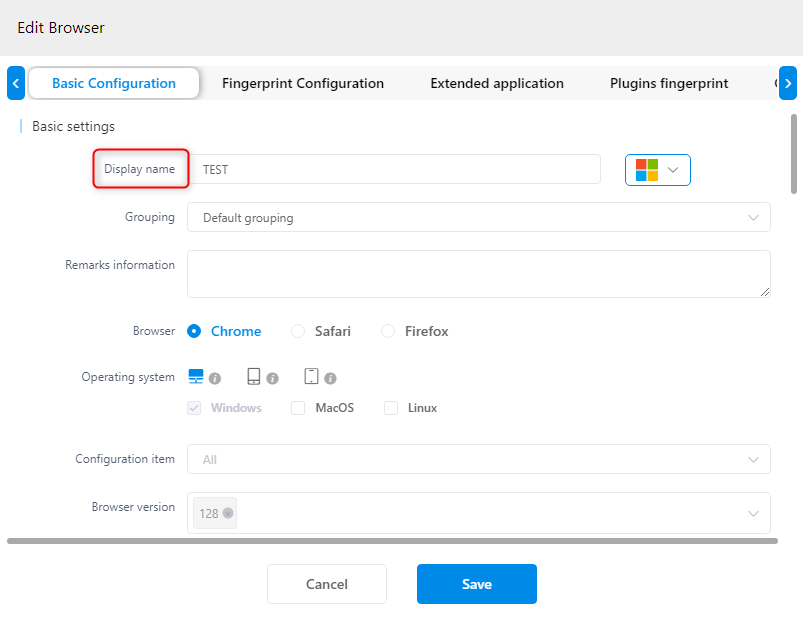
 1\. On the profile setup screen, locate the **"Display Name"** field under the **Basic Configuration** section. Assign a descriptive name to help you identify the profile later.
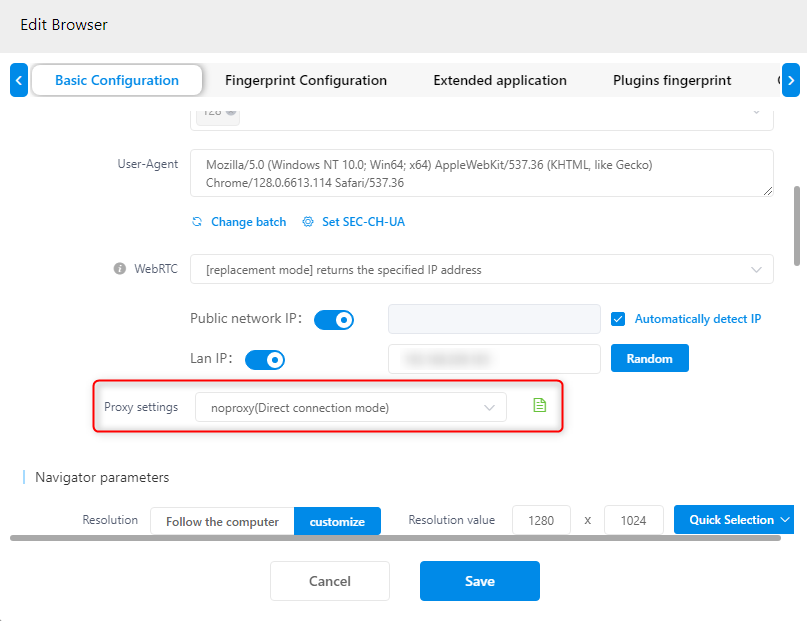
 2\. Scroll down and find the **Proxy Settings** option. Click it to open the proxy configuration panel.
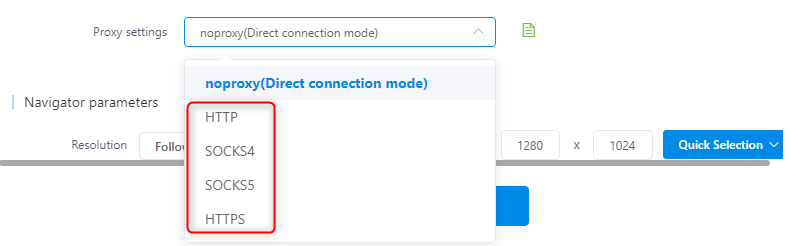
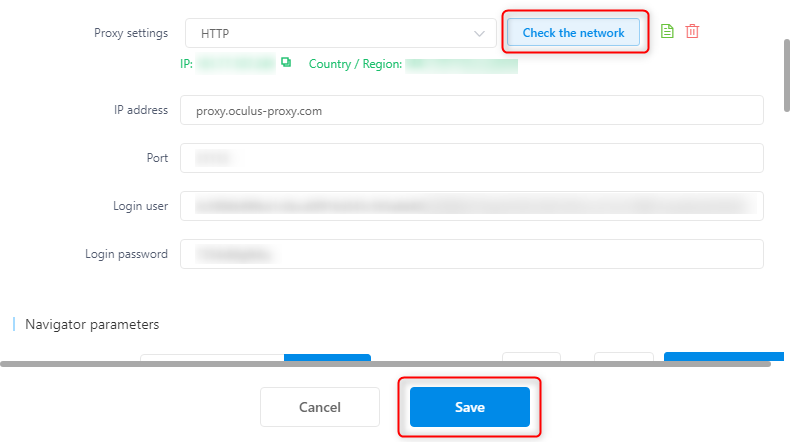
 1\. **Protocol/Type**: Select `HTTP`, `HTTPS`, or `SOCKS5` based on the proxy type you’re using.
 2\. **IP address**: Enter `proxy.oculus-proxy.com`.
3\. **Port**: Input the port number from your [Oculus Dashboard](https://oculusproxies.com/dashboard/page/plans).
4\. **Login user & Login password**: Provide your Oculus Proxy credentials. If you need a country-specific proxy, adjust your username to include the desired region (e.g., `your-username-country-US` for a US-based proxy).
5\. After completing the fields, click **Check the Network** button to verify that your proxy settings are correct.
6\. If the test is successful, click **Save** to apply the configuration.
2\. **IP address**: Enter `proxy.oculus-proxy.com`.
3\. **Port**: Input the port number from your [Oculus Dashboard](https://oculusproxies.com/dashboard/page/plans).
4\. **Login user & Login password**: Provide your Oculus Proxy credentials. If you need a country-specific proxy, adjust your username to include the desired region (e.g., `your-username-country-US` for a US-based proxy).
5\. After completing the fields, click **Check the Network** button to verify that your proxy settings are correct.
6\. If the test is successful, click **Save** to apply the configuration.
 1\. Launch the configured profile from your MuLogin dashboard.
2\. Within the isolated browser environment, visit a website like [httpbin.org/ip](http://httpbin.org/ip).
3\. Confirm that the displayed IP matches the Oculus Proxy you configured, rather than your local IP.
**You're all set!** You’ve successfully integrated **Oculus Proxies** with **MuLogin**. This setup provides a secure and reliable way to manage multiple browser profiles, ensuring your online activities remain private and protected from detection.
1\. Launch the configured profile from your MuLogin dashboard.
2\. Within the isolated browser environment, visit a website like [httpbin.org/ip](http://httpbin.org/ip).
3\. Confirm that the displayed IP matches the Oculus Proxy you configured, rather than your local IP.
**You're all set!** You’ve successfully integrated **Oculus Proxies** with **MuLogin**. This setup provides a secure and reliable way to manage multiple browser profiles, ensuring your online activities remain private and protected from detection.