> ## Documentation Index
> Fetch the complete documentation index at: https://docs.oculusproxies.com/llms.txt
> Use this file to discover all available pages before exploring further.
# How to Set Up Oculus Proxies With Octoparse
> Optimize your web scraping workflow! Integrating Oculus Proxies with Octoparse ensures secure, anonymous, and efficient data extraction. By reducing the risk of IP blocks and enhancing privacy, this setup empowers you to scrape web data seamlessly and reliably.
 ## What is Octoparse?
**Octoparse** is a no-code web scraping tool that makes data collection easy and efficient. Its user-friendly, point-and-click interface allows you to extract data from websites without any coding skills. Whether you're conducting market research, tracking prices, or generating leads, Octoparse enables you to automate, customize, and schedule your scraping tasks. Export data in formats like CSV or Excel and transform it into actionable insights with ease.
If you're using **Oculus** to access search engines like **Google, Bing, or Yandex** and facing connection issues, the proxy type could be the reason. **ISP Premium Proxies** ensure stable and unrestricted access, preventing blocks that standard proxies might encounter. Switching to **ISP Premium Proxies** can help maintain smooth and reliable performance.
## How to Integrate Oculus Proxies with Octoparse
1\. Visit the [Octoparse website](https://www.octoparse.com/download).
2\. Download the version compatible with your operating system.
3\. Install the application and launch Octoparse.
4\. Log in with your account credentials.
1\. On the Octoparse dashboard, click the **+New** button.
2\. Select **Custom Task** to begin creating a new scraping project.
## What is Octoparse?
**Octoparse** is a no-code web scraping tool that makes data collection easy and efficient. Its user-friendly, point-and-click interface allows you to extract data from websites without any coding skills. Whether you're conducting market research, tracking prices, or generating leads, Octoparse enables you to automate, customize, and schedule your scraping tasks. Export data in formats like CSV or Excel and transform it into actionable insights with ease.
If you're using **Oculus** to access search engines like **Google, Bing, or Yandex** and facing connection issues, the proxy type could be the reason. **ISP Premium Proxies** ensure stable and unrestricted access, preventing blocks that standard proxies might encounter. Switching to **ISP Premium Proxies** can help maintain smooth and reliable performance.
## How to Integrate Oculus Proxies with Octoparse
1\. Visit the [Octoparse website](https://www.octoparse.com/download).
2\. Download the version compatible with your operating system.
3\. Install the application and launch Octoparse.
4\. Log in with your account credentials.
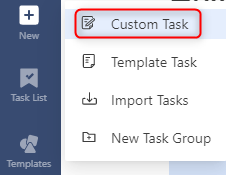
1\. On the Octoparse dashboard, click the **+New** button.
2\. Select **Custom Task** to begin creating a new scraping project.
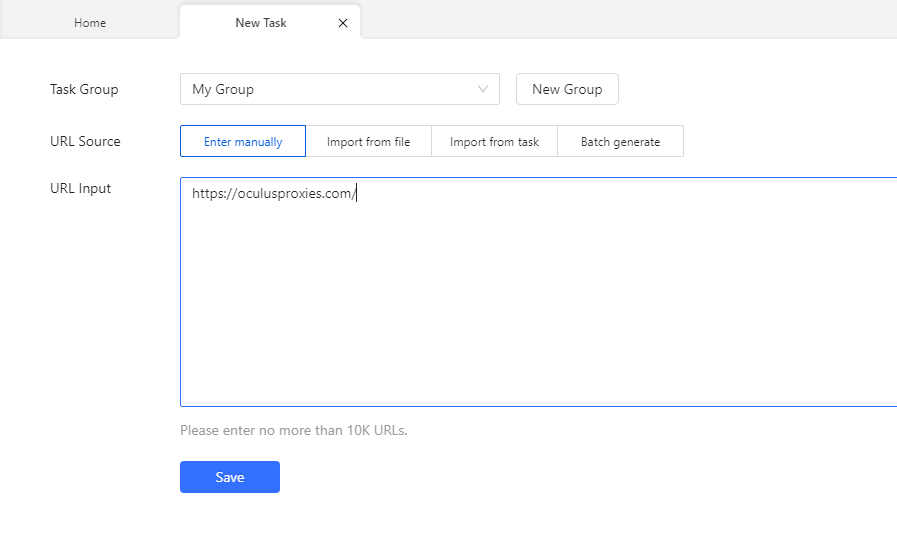
 1\. In the **URL Input** field, enter the web address of the site you want to scrape.
2\. Click **Save** to proceed.
1\. In the **URL Input** field, enter the web address of the site you want to scrape.
2\. Click **Save** to proceed.
 1\. Once the target page loads, go to **Task Settings** in the left-hand menu.
2\. Click **Anti-blocking** to access the proxy configuration options.
1\. Once the target page loads, go to **Task Settings** in the left-hand menu.
2\. Click **Anti-blocking** to access the proxy configuration options.
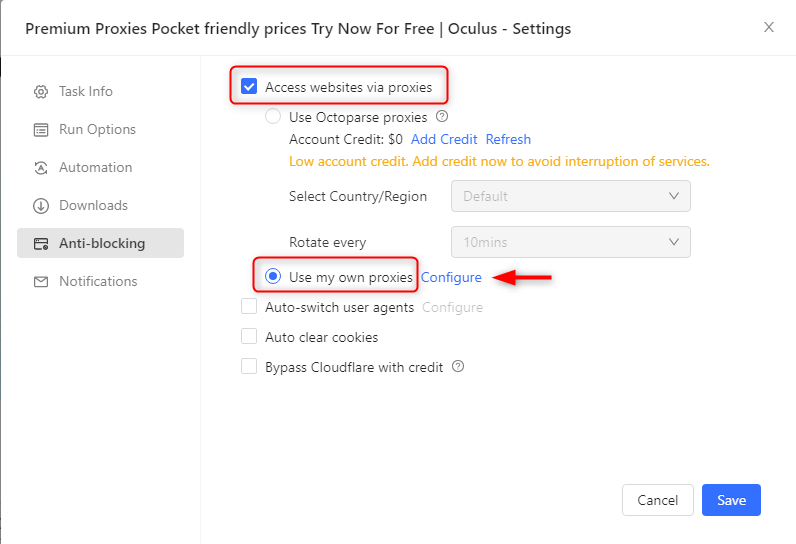
 1\. Check the box labeled **Access websites via proxies**.
2\. Enable **Use my own proxies**, then click **Configure** to open the proxy settings window.
1\. Check the box labeled **Access websites via proxies**.
2\. Enable **Use my own proxies**, then click **Configure** to open the proxy settings window.
 1\. Log in to your [Oculus Dashboard](https://oculusproxies.com/dashboard/page/plans).
2\. Click **Show Configured List** under the **Generic** tab to copy your proxy details.
3\. Paste the proxy information into the **IP Proxies** field in Octoparse.
**For country-specific proxies, modify your username to include the country code (e.g., `your-username-country-US` for a US proxy).**
1\. Log in to your [Oculus Dashboard](https://oculusproxies.com/dashboard/page/plans).
2\. Click **Show Configured List** under the **Generic** tab to copy your proxy details.
3\. Paste the proxy information into the **IP Proxies** field in Octoparse.
**For country-specific proxies, modify your username to include the country code (e.g., `your-username-country-US` for a US proxy).**
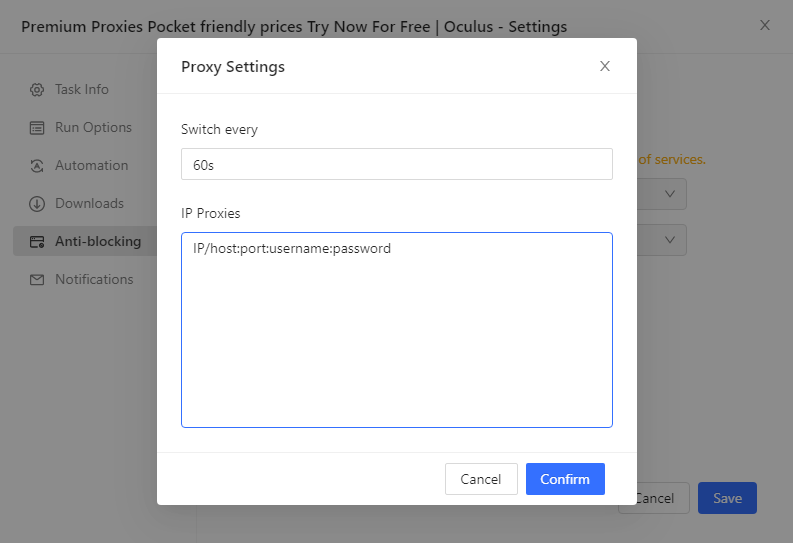 1\. If using rotating proxies, set the **Switch interval** to define how frequently IPs are rotated.
2\. For sticky proxies, adjust the **Switch interval** to align with your session requirements.
1\. Click **Confirm** to apply your proxy settings.
2\. Save the task configuration by clicking **Save**.
3\. Click **Run** to start your scraping task with your Oculus Proxy securely integrated.
**You're all set!** You’ve successfully configured **Oculus Proxies** in **Octoparse**. Now you can enjoy secure, private, and efficient web scraping without the risk of IP blocks.
1\. If using rotating proxies, set the **Switch interval** to define how frequently IPs are rotated.
2\. For sticky proxies, adjust the **Switch interval** to align with your session requirements.
1\. Click **Confirm** to apply your proxy settings.
2\. Save the task configuration by clicking **Save**.
3\. Click **Run** to start your scraping task with your Oculus Proxy securely integrated.
**You're all set!** You’ve successfully configured **Oculus Proxies** in **Octoparse**. Now you can enjoy secure, private, and efficient web scraping without the risk of IP blocks.