> ## Documentation Index
> Fetch the complete documentation index at: https://docs.oculusproxies.com/llms.txt
> Use this file to discover all available pages before exploring further.
# How to Set Up Oculus Proxies With OpenBullet
> Streamline your automation workflows! Integrating Oculus Proxies with OpenBullet provides secure, private, and reliable connections, helping you enhance your automated tasks while minimizing the risk of detection or bans. This guide will walk you through the setup process.
 ## What is OpenBullet?
**OpenBullet** is a versatile tool designed for automation, testing HTTP requests, scraping data, and creating workflows for a variety of online tasks. When paired with Oculus Proxies, OpenBullet ensures anonymity and secure connections, making it an ideal solution for efficient and undetectable operations.
If you're using **Oculus** to access search engines like **Google, Bing, or Yandex** and facing connection issues, the proxy type could be the reason. **ISP Premium Proxies** ensure stable and unrestricted access, preventing blocks that standard proxies might encounter. Switching to **ISP Premium Proxies** can help maintain smooth and reliable performance.
## How to Integrate Oculus Proxies With OpenBullet
1\. Visit the official [OpenBullet GitHub page](https://github.com/openbullet/OpenBullet2).
2\. Download the latest version of the application.
3\. Extract the downloaded file and launch the software on your system.
4\. Follow the installation instructions to complete the setup.
1\. On the OpenBullet dashboard, go to the **Proxies** tab.
2\. Click **Add Group** to create a new proxy group.
## What is OpenBullet?
**OpenBullet** is a versatile tool designed for automation, testing HTTP requests, scraping data, and creating workflows for a variety of online tasks. When paired with Oculus Proxies, OpenBullet ensures anonymity and secure connections, making it an ideal solution for efficient and undetectable operations.
If you're using **Oculus** to access search engines like **Google, Bing, or Yandex** and facing connection issues, the proxy type could be the reason. **ISP Premium Proxies** ensure stable and unrestricted access, preventing blocks that standard proxies might encounter. Switching to **ISP Premium Proxies** can help maintain smooth and reliable performance.
## How to Integrate Oculus Proxies With OpenBullet
1\. Visit the official [OpenBullet GitHub page](https://github.com/openbullet/OpenBullet2).
2\. Download the latest version of the application.
3\. Extract the downloaded file and launch the software on your system.
4\. Follow the installation instructions to complete the setup.
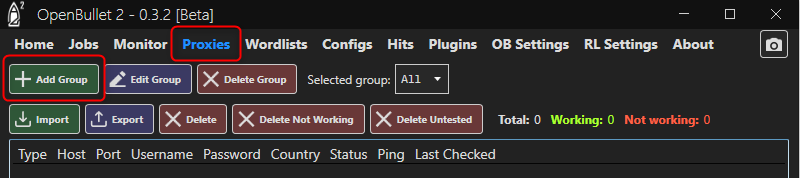
1\. On the OpenBullet dashboard, go to the **Proxies** tab.
2\. Click **Add Group** to create a new proxy group.
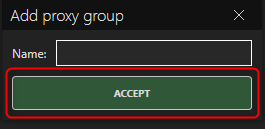
 3\. In the **Name** field, enter a descriptive name for the group (e.g., *Oculus Proxies*) to keep your proxies organized.
4\. Click **Accept** to save the new group.
3\. In the **Name** field, enter a descriptive name for the group (e.g., *Oculus Proxies*) to keep your proxies organized.
4\. Click **Accept** to save the new group.
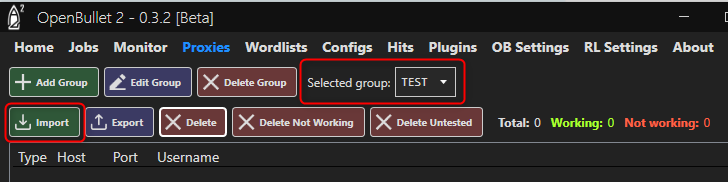
 1\. Choose the group you just created from the list of proxy groups.
2\. Click on **Import** to bring up the proxy input menu.
1\. Choose the group you just created from the list of proxy groups.
2\. Click on **Import** to bring up the proxy input menu.
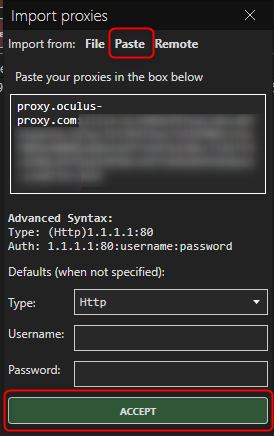
 3\. Switch to the **Paste** tab.
4\. Log in to your [Oculus dashboard](https://oculusproxies.com/dashboard/page/plans) and click **Show Configured List**.
5\. Under the **Generic** tab, copy the provided proxy code.
6\. Return to OpenBullet and paste the proxy details into the proxies field.
7\. Once added, click **Accept** to confirm and save the settings.
3\. Switch to the **Paste** tab.
4\. Log in to your [Oculus dashboard](https://oculusproxies.com/dashboard/page/plans) and click **Show Configured List**.
5\. Under the **Generic** tab, copy the provided proxy code.
6\. Return to OpenBullet and paste the proxy details into the proxies field.
7\. Once added, click **Accept** to confirm and save the settings.
 For location-specific proxies, modify your username to include the country code. For example, using `your-username-country-US` will assign a US-based exit node.
**Congratulations!** You’ve successfully integrated **Oculus Proxies** with **OpenBullet**. Now you can confidently execute automation workflows with secure, private, and reliable connections.
For location-specific proxies, modify your username to include the country code. For example, using `your-username-country-US` will assign a US-based exit node.
**Congratulations!** You’ve successfully integrated **Oculus Proxies** with **OpenBullet**. Now you can confidently execute automation workflows with secure, private, and reliable connections.