> ## Documentation Index
> Fetch the complete documentation index at: https://docs.oculusproxies.com/llms.txt
> Use this file to discover all available pages before exploring further.
# How to Set Up Oculus Proxies With SRWare Iron Browser
> Enhance your privacy and secure your online activities with Oculus Proxies in SRWare Iron Browser. This guide will help you configure reliable proxy connections for a safer and more private browsing experience.
 ## What is SRWare Iron Browser?
**SRWare Iron** is a privacy-focused web browser based on Chromium, designed to offer a secure and tracking-free browsing experience. Unlike traditional browsers, it removes invasive tracking features, ensuring better data protection. It is ideal for users who prioritize security while maintaining the familiar Chrome-like interface. With **Oculus Proxies**, you can further enhance anonymity, utilize secure proxy connections, and bypass restrictions for seamless and private online browsing.
If you’re using **Oculus** to access search engines like **Google, Bing, or Yandex** and facing connection issues, your proxy type may need adjustment. **ISP Premium Proxies** provide stable and unrestricted access, preventing blocks that standard proxies might encounter. Switching to **ISP Premium Proxies** can improve performance.
## How to Set Up Oculus Proxies With SRWare Iron Browser
1\. Download **SRWare Iron Browser** from the official [SRWare website](https://www.srware.net/iron/#downloads).
2\. Follow the installation instructions to complete the setup.
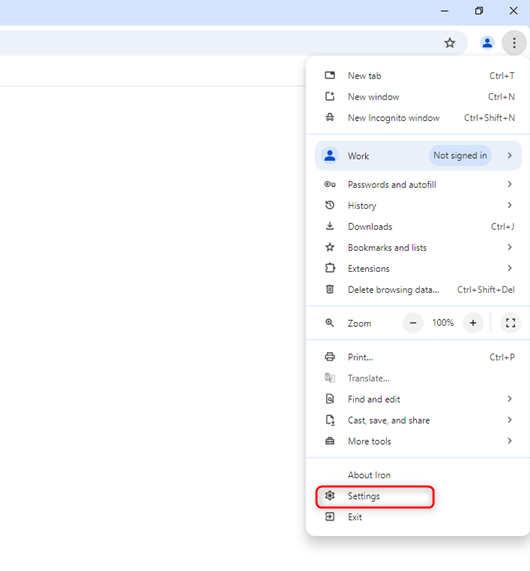
1\. Click the **three-dot menu** (top-right corner).
2\. Select **Settings** from the dropdown menu.
## What is SRWare Iron Browser?
**SRWare Iron** is a privacy-focused web browser based on Chromium, designed to offer a secure and tracking-free browsing experience. Unlike traditional browsers, it removes invasive tracking features, ensuring better data protection. It is ideal for users who prioritize security while maintaining the familiar Chrome-like interface. With **Oculus Proxies**, you can further enhance anonymity, utilize secure proxy connections, and bypass restrictions for seamless and private online browsing.
If you’re using **Oculus** to access search engines like **Google, Bing, or Yandex** and facing connection issues, your proxy type may need adjustment. **ISP Premium Proxies** provide stable and unrestricted access, preventing blocks that standard proxies might encounter. Switching to **ISP Premium Proxies** can improve performance.
## How to Set Up Oculus Proxies With SRWare Iron Browser
1\. Download **SRWare Iron Browser** from the official [SRWare website](https://www.srware.net/iron/#downloads).
2\. Follow the installation instructions to complete the setup.
1\. Click the **three-dot menu** (top-right corner).
2\. Select **Settings** from the dropdown menu.
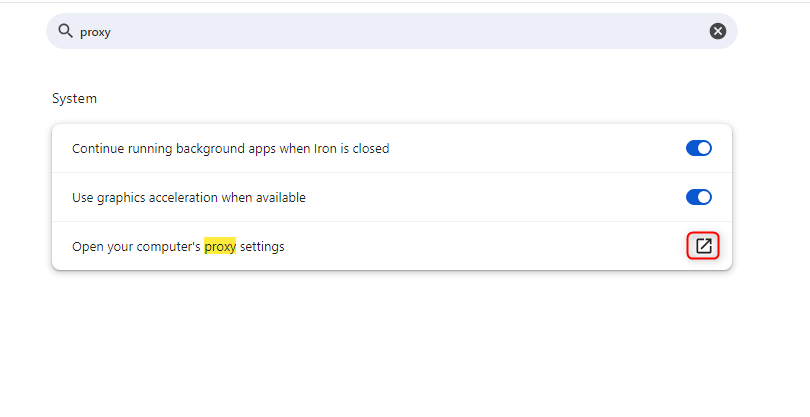
 1\. Use the **search bar** at the top of the Settings page and type **Proxy**.
2\. Click **Open your computer’s proxy settings**.
1\. Use the **search bar** at the top of the Settings page and type **Proxy**.
2\. Click **Open your computer’s proxy settings**.
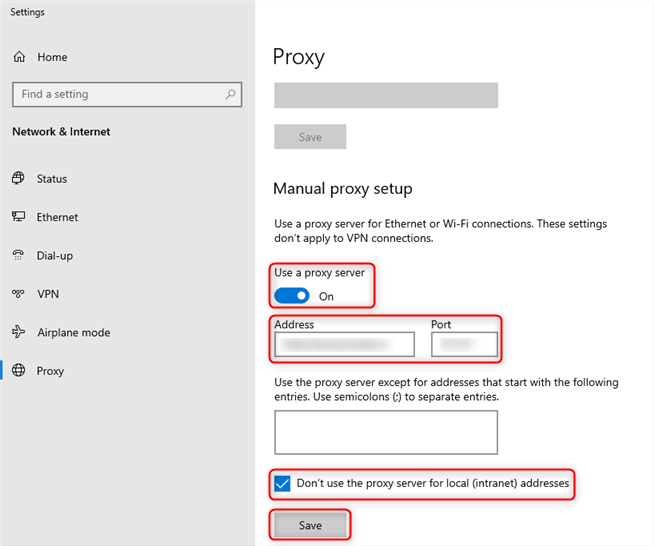
 1\. In **Manual Proxy Setup**, toggle **Use a proxy server** to *On*.
2\. Enter your **Oculus Proxy** details:
* **Address**: `proxy.oculus-proxy.com`
* **Port**: Use the port from your [Oculus Dashboard](https://oculusproxies.com/dashboard/page/plans)
3\. Click **Save** to apply the settings.
1\. In **Manual Proxy Setup**, toggle **Use a proxy server** to *On*.
2\. Enter your **Oculus Proxy** details:
* **Address**: `proxy.oculus-proxy.com`
* **Port**: Use the port from your [Oculus Dashboard](https://oculusproxies.com/dashboard/page/plans)
3\. Click **Save** to apply the settings.
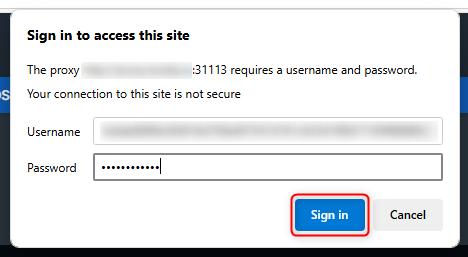
 1\. Close settings and refresh any open webpages.
2\. When prompted, enter your **Oculus Proxy username and password**.
1\. Close settings and refresh any open webpages.
2\. When prompted, enter your **Oculus Proxy username and password**.
 1\. Open a new tab and visit [httpbin.org/ip](http://httpbin.org/ip) to confirm your IP address.
2\. Ensure the displayed IP matches your configured Oculus Proxy.
1\. Open a new tab and visit [httpbin.org/ip](http://httpbin.org/ip) to confirm your IP address.
2\. Ensure the displayed IP matches your configured Oculus Proxy.
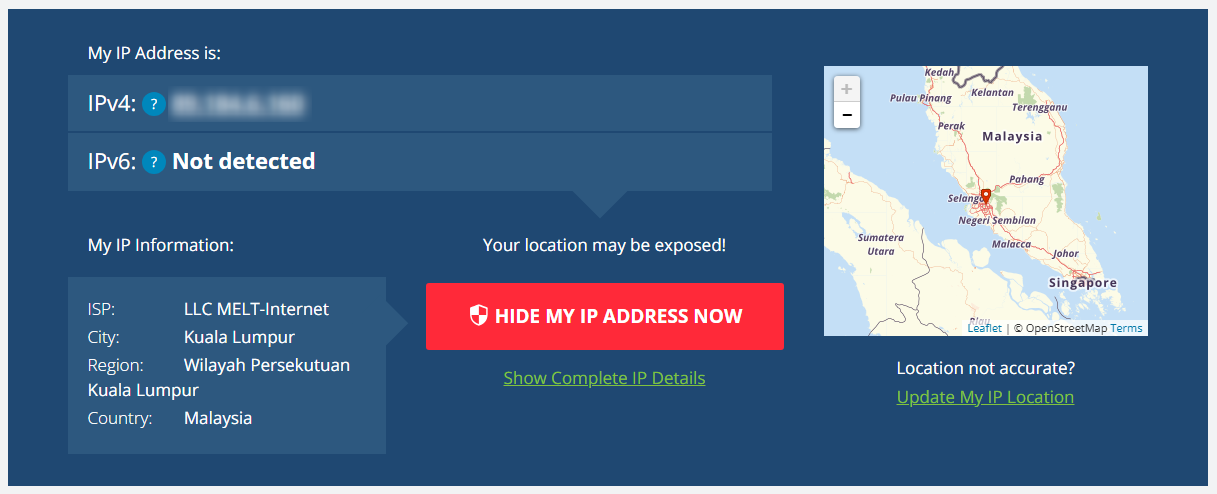 **Success!** You’ve now configured **Oculus Proxies** in **SRWare Iron Browser**. Enjoy private, secure, and unrestricted browsing with enhanced anonymity.