> ## Documentation Index
> Fetch the complete documentation index at: https://docs.oculusproxies.com/llms.txt
> Use this file to discover all available pages before exploring further.
# How to Set Up Oculus Proxies With TexAu
> Unlock the full potential of automation! By integrating Oculus Proxies with TexAu, you can secure your workflows, access geo-targeted data, and protect your online identity during automated tasks. This guide provides step-by-step instructions to configure Oculus Proxies for seamless automation.
 ## What is TexAu?
**TexAu** is a powerful growth automation platform designed to help businesses and marketers scale their operations. From lead generation to online engagement, TexAu simplifies repetitive tasks with its robust automation tools. Pairing TexAu with **Oculus Proxies** enhances its capabilities by safeguarding your privacy and ensuring uninterrupted access to location-specific resources.
If you're using **Oculus** to access search engines like **Google, Bing, or Yandex** and facing connection issues, the proxy type could be the reason. **ISP Premium Proxies** ensure stable and unrestricted access, preventing blocks that standard proxies might encounter. Switching to **ISP Premium Proxies** can help maintain smooth and reliable performance.
## How to Integrate Oculus Proxies With TexAu
1\. Visit the [TexAu website](https://texau.com/) and log in to your account.
2\. Once logged in, navigate to the **Dashboard**, where you’ll manage and configure your automation workflows.
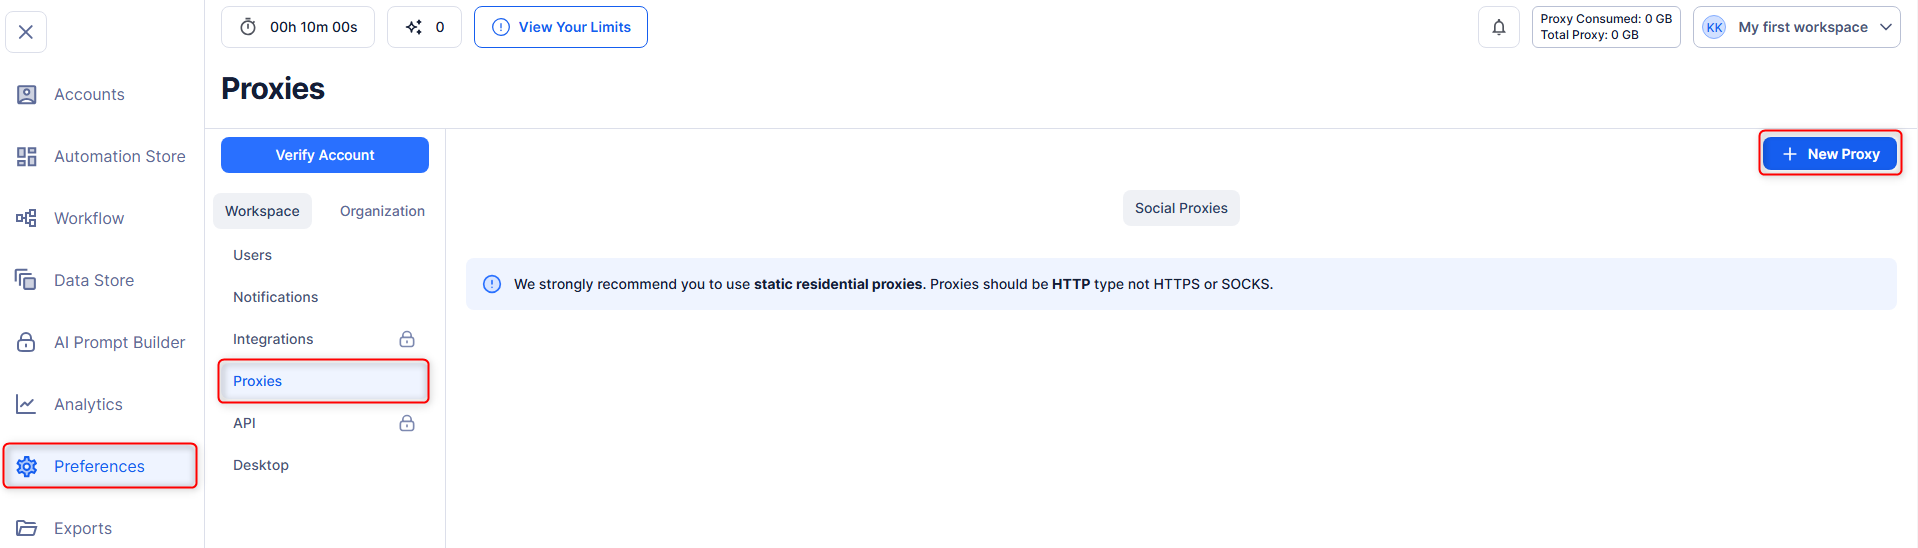
1\. In the left-hand menu, click on **Preferences** to access the settings page.
2\. Go to the **Proxies** tab to open the proxy configuration section.
3\. Click **New Proxy** to start setting up your Oculus Proxy.
## What is TexAu?
**TexAu** is a powerful growth automation platform designed to help businesses and marketers scale their operations. From lead generation to online engagement, TexAu simplifies repetitive tasks with its robust automation tools. Pairing TexAu with **Oculus Proxies** enhances its capabilities by safeguarding your privacy and ensuring uninterrupted access to location-specific resources.
If you're using **Oculus** to access search engines like **Google, Bing, or Yandex** and facing connection issues, the proxy type could be the reason. **ISP Premium Proxies** ensure stable and unrestricted access, preventing blocks that standard proxies might encounter. Switching to **ISP Premium Proxies** can help maintain smooth and reliable performance.
## How to Integrate Oculus Proxies With TexAu
1\. Visit the [TexAu website](https://texau.com/) and log in to your account.
2\. Once logged in, navigate to the **Dashboard**, where you’ll manage and configure your automation workflows.
1\. In the left-hand menu, click on **Preferences** to access the settings page.
2\. Go to the **Proxies** tab to open the proxy configuration section.
3\. Click **New Proxy** to start setting up your Oculus Proxy.
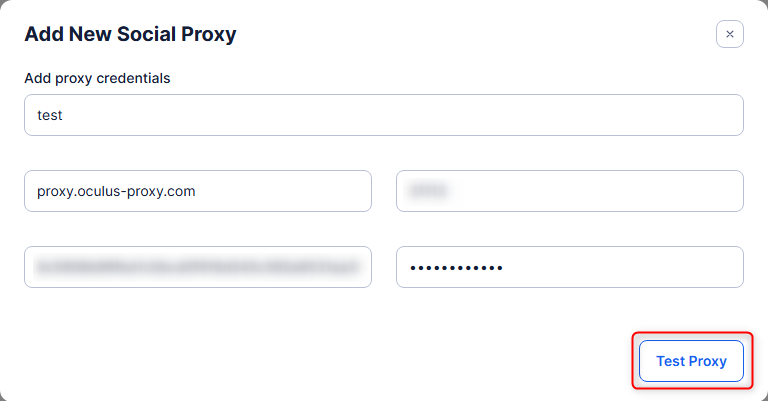
 1\. In the proxy configuration window, provide the following details:
* **Host**: Enter `proxy.oculus-proxy.com`.
* **Port**: Input the port number provided in your [Oculus Dashboard](https://oculusproxies.com/dashboard/page/plans).
* **Username**: Enter your Oculus Proxy username.
* **Password**: Enter your Oculus Proxy password.
2\. Click **Test Proxy** to verify the connection.
1\. In the proxy configuration window, provide the following details:
* **Host**: Enter `proxy.oculus-proxy.com`.
* **Port**: Input the port number provided in your [Oculus Dashboard](https://oculusproxies.com/dashboard/page/plans).
* **Username**: Enter your Oculus Proxy username.
* **Password**: Enter your Oculus Proxy password.
2\. Click **Test Proxy** to verify the connection.
 For region-specific proxies, append the desired country code to your username. For example, use `your-username-country-US` to route traffic through a US-based proxy.
1\. Click **Save** to store your proxy configuration.
2\. The proxy is now ready to be applied to your TexAu workflows.
**Congratulations!** You’ve successfully integrated **Oculus Proxies** with **TexAu**. Now you can automate tasks securely and efficiently while maintaining privacy. Whether you’re generating leads, collecting data, or managing engagement, Oculus Proxies provide the reliability and anonymity you need for optimized performance.
For region-specific proxies, append the desired country code to your username. For example, use `your-username-country-US` to route traffic through a US-based proxy.
1\. Click **Save** to store your proxy configuration.
2\. The proxy is now ready to be applied to your TexAu workflows.
**Congratulations!** You’ve successfully integrated **Oculus Proxies** with **TexAu**. Now you can automate tasks securely and efficiently while maintaining privacy. Whether you’re generating leads, collecting data, or managing engagement, Oculus Proxies provide the reliability and anonymity you need for optimized performance.