> ## Documentation Index
> Fetch the complete documentation index at: https://docs.oculusproxies.com/llms.txt
> Use this file to discover all available pages before exploring further.
# How to Set Up Oculus Proxies With VMLogin
> Enhance your multi-account management! By integrating Oculus Proxies with VMLogin, you can ensure secure, anonymous browsing and minimize the risk of detection or IP bans. This guide will help you configure Oculus Proxies with VMLogin for efficient and reliable account management.
 ## What is VMLogin?
**VMLogin** helps you safely manage multiple online accounts by creating virtual browser profiles with unique digital fingerprints. Each profile is isolated, appearing as a separate user to websites, ensuring no connections or red flags are raised.
Whether you're managing social media accounts, running e-commerce stores, exploring affiliate marketing, or conducting web scraping, VMLogin’s advanced anti-detection technology and user-friendly design make account management efficient and secure.
If you're using **Oculus** to access search engines like **Google, Bing, or Yandex** and facing connection issues, the proxy type could be the reason. **ISP Premium Proxies** ensure stable and unrestricted access, preventing blocks that standard proxies might encounter. Switching to **ISP Premium Proxies** can help maintain smooth and reliable performance.
## How to Integrate Oculus Proxies with VMLogin
1\. Visit the [VMLogin download page](https://www.vmlogin.us/download.html).
2\. Download and install the software on your computer.
3\. Launch VMLogin and log in to your account.
1\. From the VMLogin dashboard, click **New browser profile**.
## What is VMLogin?
**VMLogin** helps you safely manage multiple online accounts by creating virtual browser profiles with unique digital fingerprints. Each profile is isolated, appearing as a separate user to websites, ensuring no connections or red flags are raised.
Whether you're managing social media accounts, running e-commerce stores, exploring affiliate marketing, or conducting web scraping, VMLogin’s advanced anti-detection technology and user-friendly design make account management efficient and secure.
If you're using **Oculus** to access search engines like **Google, Bing, or Yandex** and facing connection issues, the proxy type could be the reason. **ISP Premium Proxies** ensure stable and unrestricted access, preventing blocks that standard proxies might encounter. Switching to **ISP Premium Proxies** can help maintain smooth and reliable performance.
## How to Integrate Oculus Proxies with VMLogin
1\. Visit the [VMLogin download page](https://www.vmlogin.us/download.html).
2\. Download and install the software on your computer.
3\. Launch VMLogin and log in to your account.
1\. From the VMLogin dashboard, click **New browser profile**.
 2\. In the **Display name** field, give your browser profile a meaningful name to easily identify it.
3\. In the profile setup menu, locate and click **Setting proxy server**. This will open the proxy configuration window.
2\. In the **Display name** field, give your browser profile a meaningful name to easily identify it.
3\. In the profile setup menu, locate and click **Setting proxy server**. This will open the proxy configuration window.
 1\. Enable the **Proxy server** toggle.
2\. Fill in the proxy fields using your Oculus Proxy details from the [Oculus Dashboard](https://oculusproxies.com/dashboard/page/plans):
* **Proxy type**: Select `HTTP`, `HTTPS`, or `SOCKS5` depending on your proxy type.
* **IP address**: Enter `proxy.oculus-proxy.com`.
* **Port**: Input the port number provided in your Oculus dashboard.
* **Username**: Enter your Oculus Proxy username.
* **Password**: Enter your Oculus Proxy password.
1\. Enable the **Proxy server** toggle.
2\. Fill in the proxy fields using your Oculus Proxy details from the [Oculus Dashboard](https://oculusproxies.com/dashboard/page/plans):
* **Proxy type**: Select `HTTP`, `HTTPS`, or `SOCKS5` depending on your proxy type.
* **IP address**: Enter `proxy.oculus-proxy.com`.
* **Port**: Input the port number provided in your Oculus dashboard.
* **Username**: Enter your Oculus Proxy username.
* **Password**: Enter your Oculus Proxy password.
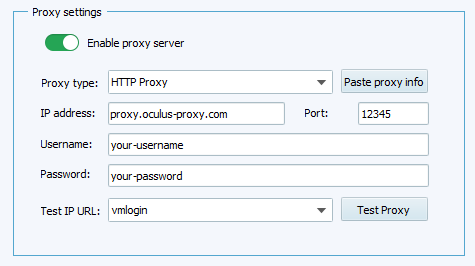 For country-specific proxies, you can enter a format like `your-username-country-US` to receive a US exit node.
1\. Click **Test Proxy** to verify the connection. Ensure the test confirms that the proxy is working.
2\. Once successful, click **Save** to finalize the proxy setup.
For country-specific proxies, you can enter a format like `your-username-country-US` to receive a US exit node.
1\. Click **Test Proxy** to verify the connection. Ensure the test confirms that the proxy is working.
2\. Once successful, click **Save** to finalize the proxy setup.
 After configuring the proxy and any additional profile settings, click **Save profile** to complete the setup.
**That’s it!** You’ve successfully integrated **Oculus proxies** with **VMLogin**. Now you can manage multiple accounts securely and anonymously with ease!
After configuring the proxy and any additional profile settings, click **Save profile** to complete the setup.
**That’s it!** You’ve successfully integrated **Oculus proxies** with **VMLogin**. Now you can manage multiple accounts securely and anonymously with ease!