> ## Documentation Index
> Fetch the complete documentation index at: https://docs.oculusproxies.com/llms.txt
> Use this file to discover all available pages before exploring further.
# How to Set Up Oculus Proxies on Windows
> Unlock the full potential of your internet connection! Proxies are your online secret weapon—they let you access geo-restricted content, hide your IP address, and protect your device from malicious threats. This guide will walk you through setting up a proxy server on Windows, whether you’re using Windows 10 or 11.
 If you're using **Oculus** to access search engines like **Google, Bing, or Yandex** and facing connection issues, the proxy type could be the reason. **ISP Premium Proxies** ensure stable and unrestricted access, preventing blocks that standard proxies might encounter. Switching to **ISP Premium Proxies** can help maintain smooth and reliable performance.
## Setting Up Proxies on Windows
Setting up a proxy server on Windows 10 and 11 is straightforward as both versions follow a similar process. Here's a step-by-step guide to configure your system with **Oculus Proxies**:
1\. Press **Windows + I** to open the **Settings** app.
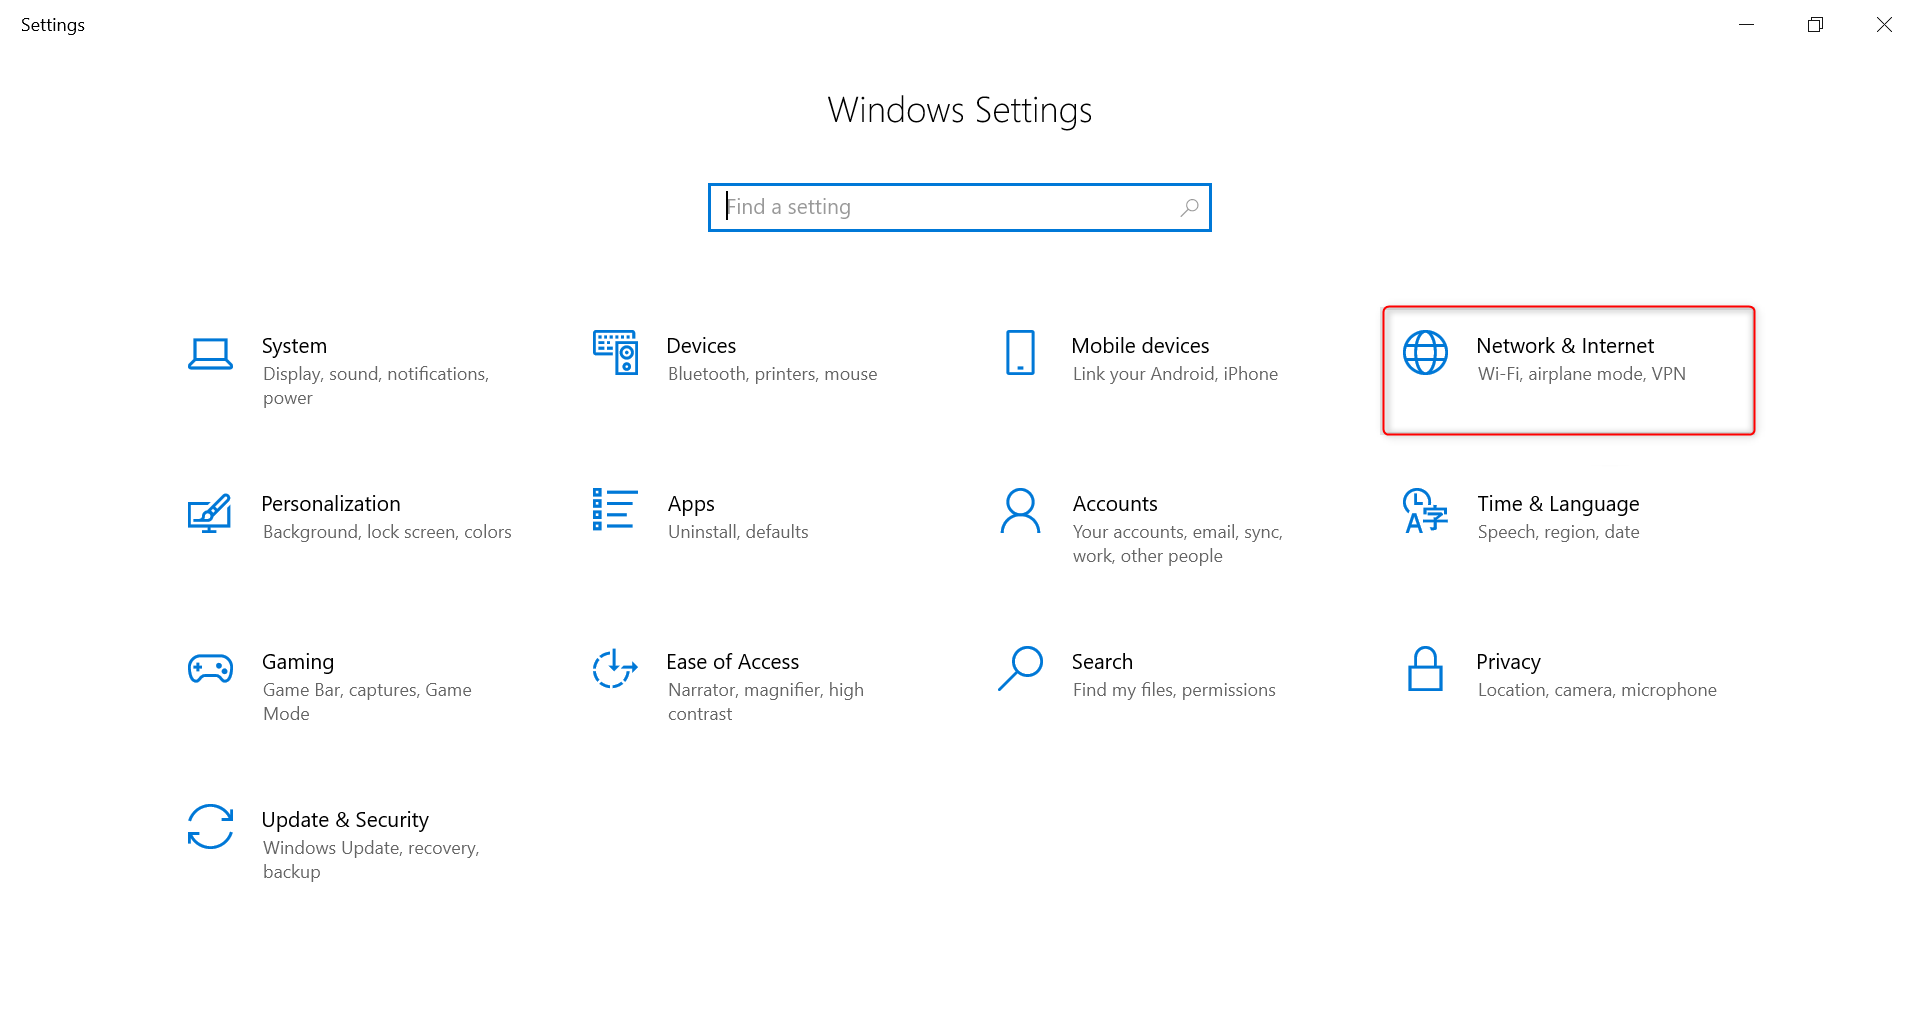
2\. Navigate to **Network & Internet** from the menu options.
If you're using **Oculus** to access search engines like **Google, Bing, or Yandex** and facing connection issues, the proxy type could be the reason. **ISP Premium Proxies** ensure stable and unrestricted access, preventing blocks that standard proxies might encounter. Switching to **ISP Premium Proxies** can help maintain smooth and reliable performance.
## Setting Up Proxies on Windows
Setting up a proxy server on Windows 10 and 11 is straightforward as both versions follow a similar process. Here's a step-by-step guide to configure your system with **Oculus Proxies**:
1\. Press **Windows + I** to open the **Settings** app.
2\. Navigate to **Network & Internet** from the menu options.
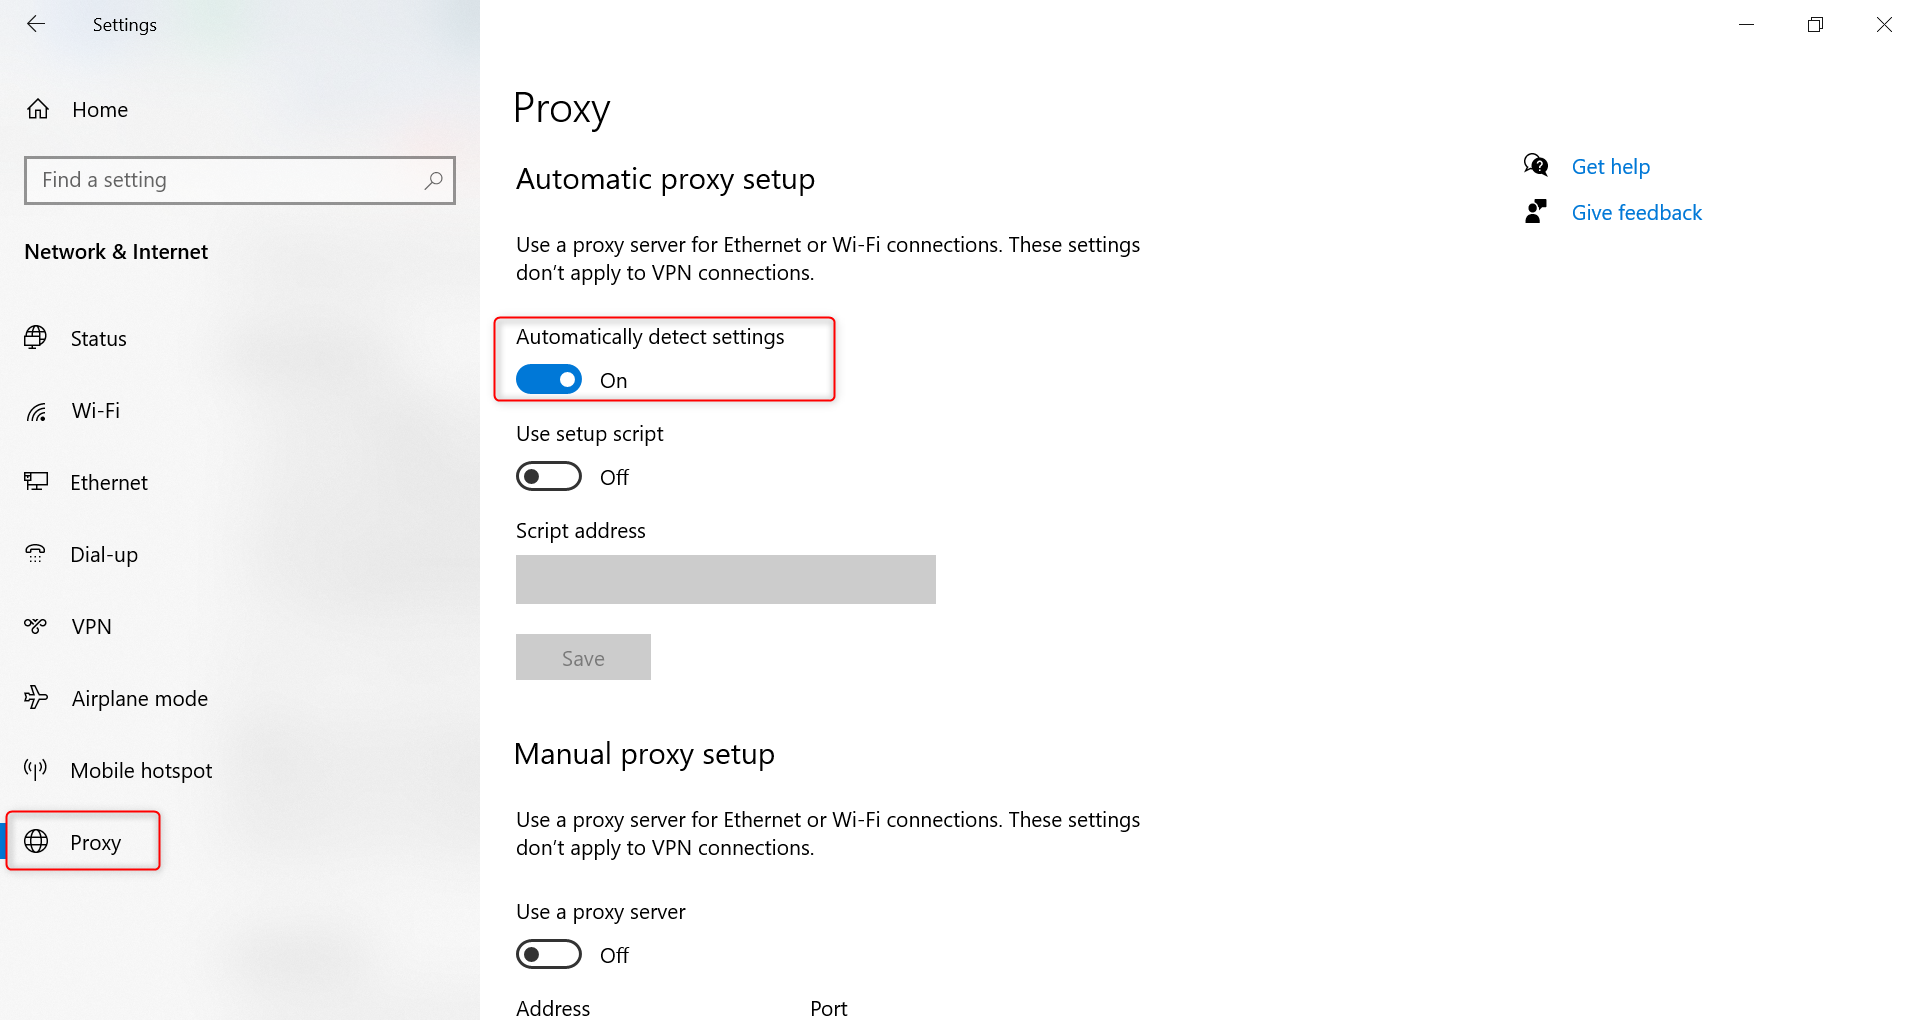
 1\. In the left sidebar, click on **Proxy**.
2\. Under the **Automatic proxy setup** section, toggle **Automatically detect settings** to *On*.
1\. In the left sidebar, click on **Proxy**.
2\. Under the **Automatic proxy setup** section, toggle **Automatically detect settings** to *On*.
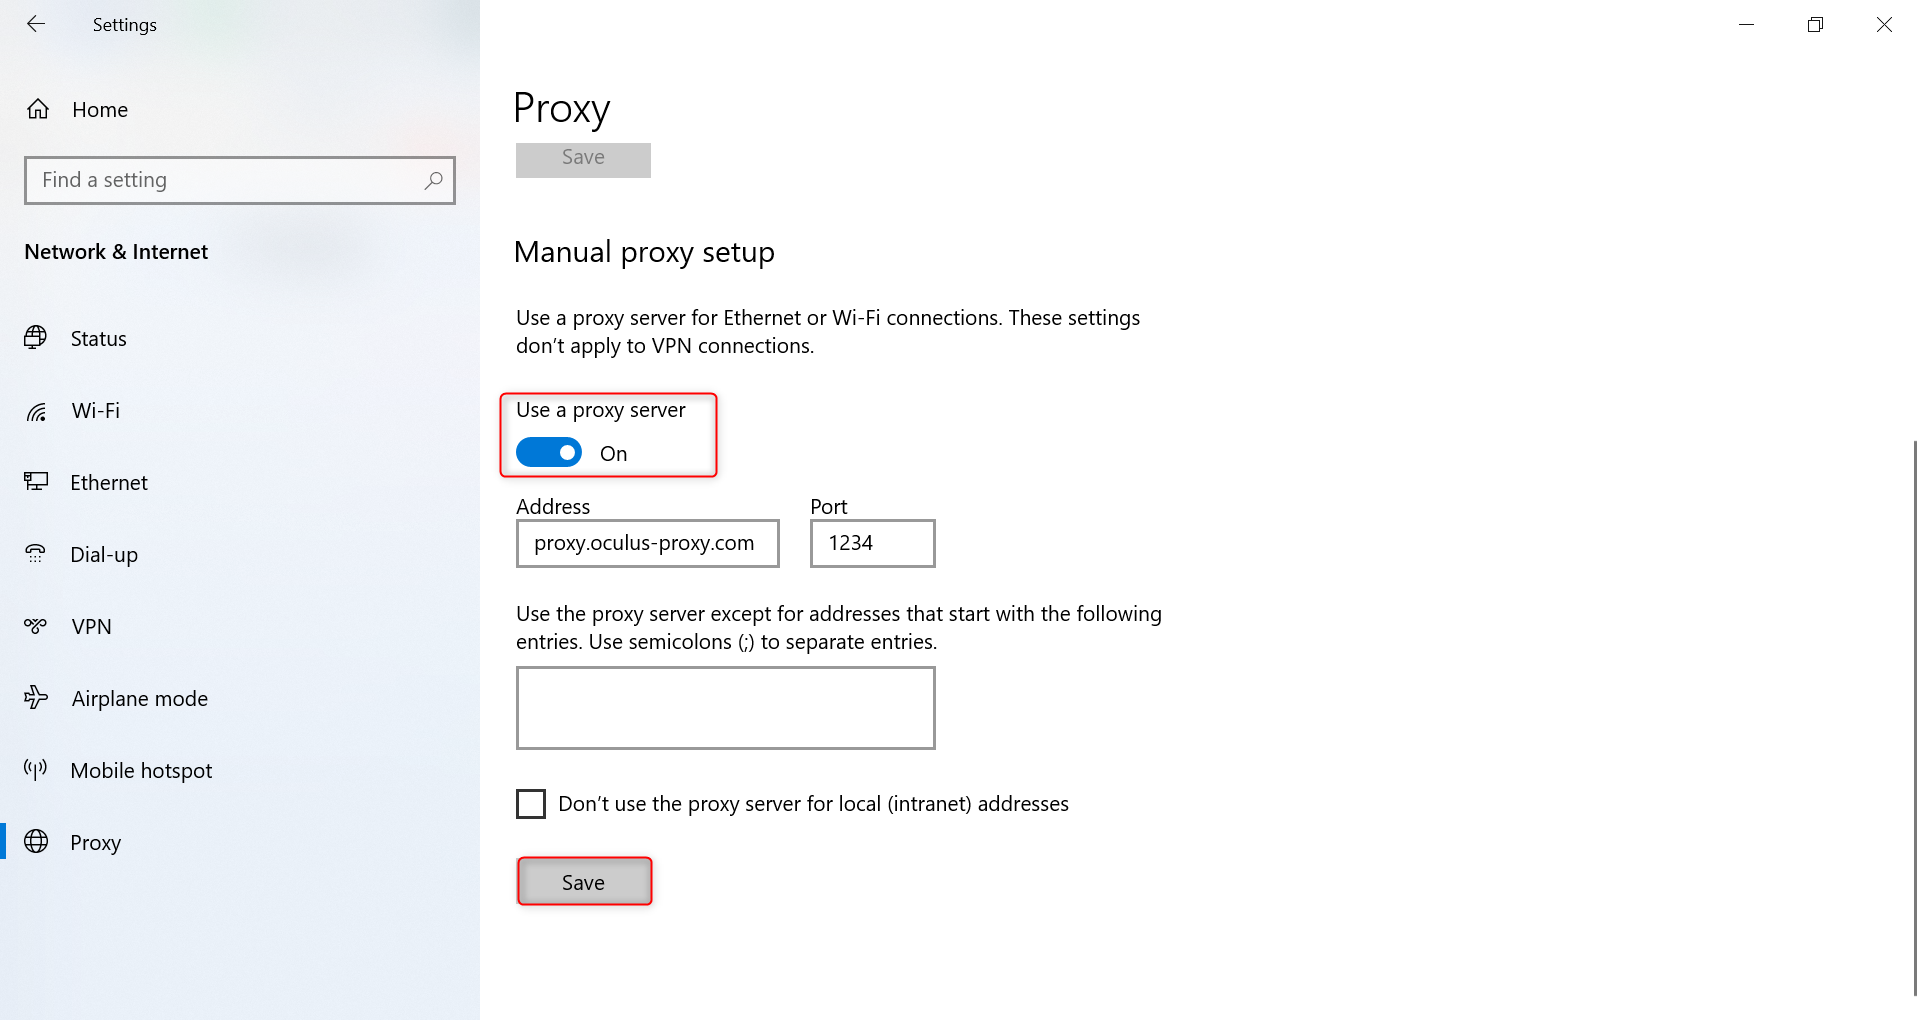
 1\. Scroll down to the **Manual proxy setup** section and toggle **Use a proxy server** to *On*.
2\. Fill in your **Oculus Proxy** details:
* **Address**: Enter `proxy.oculus-proxy.com`.
* **Port**: Use the port number from your [Oculus Dashboard](https://oculusproxies.com/dashboard/page/plans).
3\. Once completed, click **Save** to apply the changes.
1\. Scroll down to the **Manual proxy setup** section and toggle **Use a proxy server** to *On*.
2\. Fill in your **Oculus Proxy** details:
* **Address**: Enter `proxy.oculus-proxy.com`.
* **Port**: Use the port number from your [Oculus Dashboard](https://oculusproxies.com/dashboard/page/plans).
3\. Once completed, click **Save** to apply the changes.
 Windows does not have built-in fields for entering usernames and passwords. You’ll need to input these credentials when prompted by applications using the proxy. When accessing a website, a pop-up will appear asking for your credentials. Simply enter your **Username** and **Password** from your Oculus Proxies account.
**That’s it!** Your Windows device is now set up with **Oculus Proxies**, giving you enhanced privacy, unrestricted access, and a secure browsing experience. Whether you're working, streaming, or just surfing, you’re ready to go!
Windows does not have built-in fields for entering usernames and passwords. You’ll need to input these credentials when prompted by applications using the proxy. When accessing a website, a pop-up will appear asking for your credentials. Simply enter your **Username** and **Password** from your Oculus Proxies account.
**That’s it!** Your Windows device is now set up with **Oculus Proxies**, giving you enhanced privacy, unrestricted access, and a secure browsing experience. Whether you're working, streaming, or just surfing, you’re ready to go!