> ## Documentation Index
> Fetch the complete documentation index at: https://docs.oculusproxies.com/llms.txt
> Use this file to discover all available pages before exploring further.
# How to Set Up Oculus Proxies With XLogin
> Streamline your multi-account management! Integrating Oculus Proxies with XLogin enhances your ability to manage multiple accounts securely and anonymously. By reducing the risk of detection and bans, this setup ensures efficient workflows and reliable online access.
 ## What is XLogin?
**XLogin** is a powerful anti-detect browser designed for secure multi-account management. It allows users to create isolated browser profiles with unique digital fingerprints, ensuring that each account operates independently and remains undetected.
XLogin is widely used in industries such as internet marketing, cryptocurrency trading, and affiliate marketing.
If you're using **Oculus** to access search engines like **Google, Bing, or Yandex** and facing connection issues, the proxy type could be the reason. **ISP Premium Proxies** ensure stable and unrestricted access, preventing blocks that standard proxies might encounter. Switching to **ISP Premium Proxies** can help maintain smooth and reliable performance.
1\. Download **XLogin** from the [official website](https://xlogin.us/).
2\. Follow the on-screen instructions to install the software.
3\. Launch the application and log in with your account credentials.
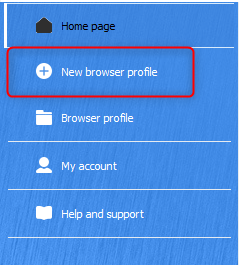
1\. From the XLogin dashboard, click **New Browser Profile** to create a fresh profile.
## What is XLogin?
**XLogin** is a powerful anti-detect browser designed for secure multi-account management. It allows users to create isolated browser profiles with unique digital fingerprints, ensuring that each account operates independently and remains undetected.
XLogin is widely used in industries such as internet marketing, cryptocurrency trading, and affiliate marketing.
If you're using **Oculus** to access search engines like **Google, Bing, or Yandex** and facing connection issues, the proxy type could be the reason. **ISP Premium Proxies** ensure stable and unrestricted access, preventing blocks that standard proxies might encounter. Switching to **ISP Premium Proxies** can help maintain smooth and reliable performance.
1\. Download **XLogin** from the [official website](https://xlogin.us/).
2\. Follow the on-screen instructions to install the software.
3\. Launch the application and log in with your account credentials.
1\. From the XLogin dashboard, click **New Browser Profile** to create a fresh profile.
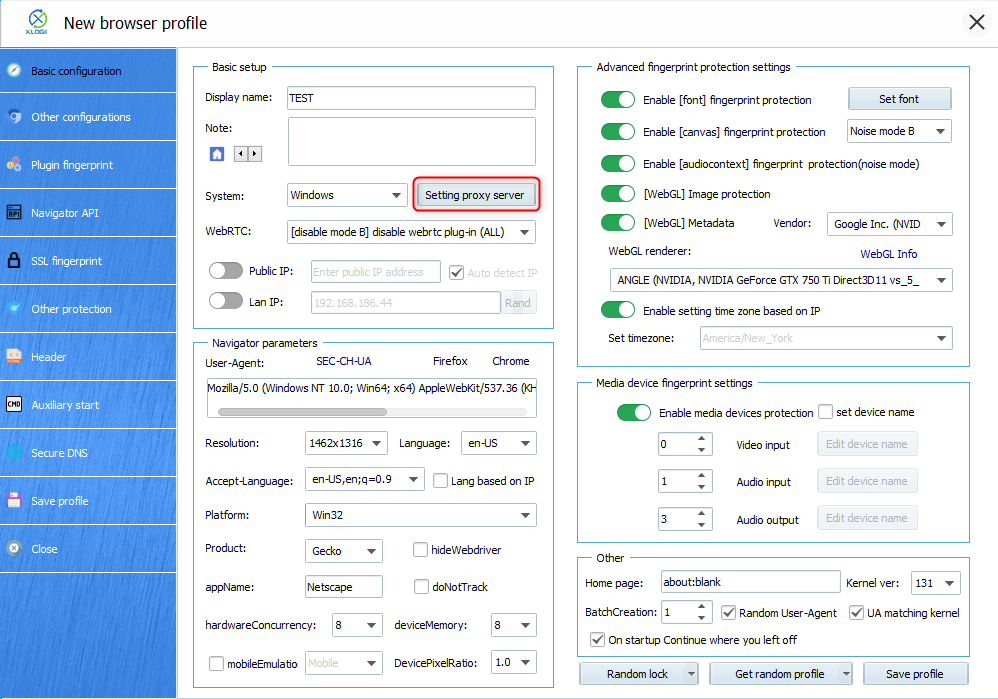
 2\. In the **Display Name** field, give your profile a name for easy identification.
3\. In the profile setup menu, locate the **Setting proxy server** button.
2\. In the **Display Name** field, give your profile a name for easy identification.
3\. In the profile setup menu, locate the **Setting proxy server** button.
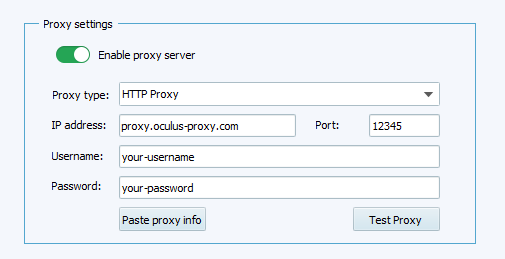
 1\. Toggle the **Enable Proxy Server** to open the proxy configuration panel.
2\. Fill in the following fields with your Oculus proxy details:
* **Proxy type**: Choose from `HTTP`, `HTTPS`, or `SOCKS5` (based on your proxy type).
* **IP address**: Enter `proxy.oculus-proxy.com`.
* **Port**: Use the port number provided in your [Oculus dashboard](https://oculusproxies.com/dashboard).
* **Username**: Enter your Oculus proxy `username`.
* **Password**: Enter your Oculus proxy `password`.
1\. Toggle the **Enable Proxy Server** to open the proxy configuration panel.
2\. Fill in the following fields with your Oculus proxy details:
* **Proxy type**: Choose from `HTTP`, `HTTPS`, or `SOCKS5` (based on your proxy type).
* **IP address**: Enter `proxy.oculus-proxy.com`.
* **Port**: Use the port number provided in your [Oculus dashboard](https://oculusproxies.com/dashboard).
* **Username**: Enter your Oculus proxy `username`.
* **Password**: Enter your Oculus proxy `password`.
 For country-specific proxies, you can enter a format like `your-username-country-US` to receive a US exit node.
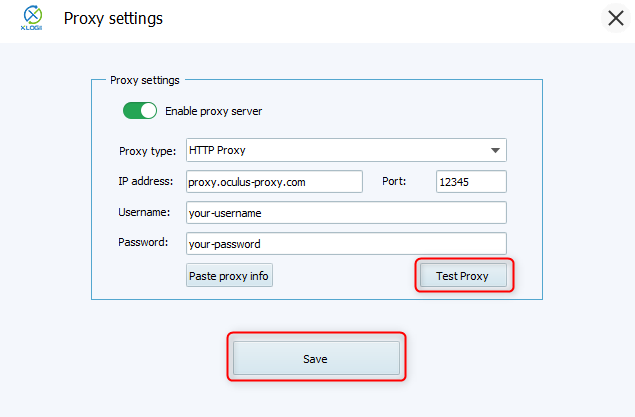
1\. Click **Test Proxy** to verify that the connection works.
2\. If the test is successful, click **Save** to finalize the proxy settings.
For country-specific proxies, you can enter a format like `your-username-country-US` to receive a US exit node.
1\. Click **Test Proxy** to verify that the connection works.
2\. If the test is successful, click **Save** to finalize the proxy settings.
 **You’ve successfully integrated Oculus Proxies with XLogin!** Now you can confidently manage multiple accounts while ensuring maximum security, privacy, and efficiency. Enjoy seamless workflows and peace of mind!